


How to Add Custom Music to NES ROMs
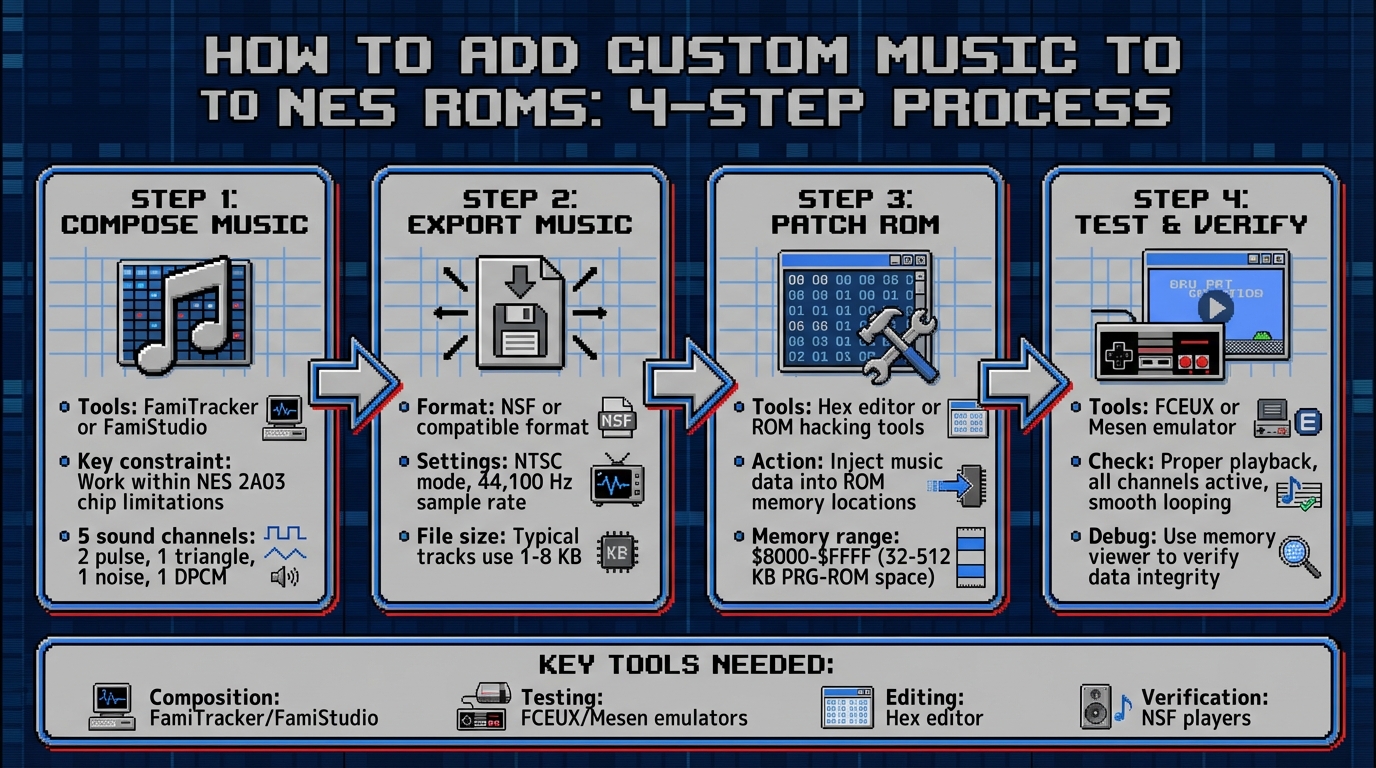
Adding custom music to NES ROMs lets you modify or create soundtracks for classic games. The NES uses the Ricoh 2A03/2A07 chip, which has five sound channels: two pulse, one triangle, one noise, and one DPCM for low-quality samples. To compose music, tools like FamiTracker or FamiStudio are essential. You'll also need emulators, hex editors, and patching tools to inject music into ROMs. Here's a quick breakdown:
- Tools Needed: FamiTracker/FamiStudio, emulators (e.g., FCEUX), hex editor, and NSF players.
-
Steps:
- Compose music in FamiTracker/FamiStudio using NES's sound limitations.
- Export as NSF or compatible format.
- Patch the ROM using a hex editor or ROM hacking tools.
- Test the ROM in an emulator to ensure proper playback.
- Challenges: Limited memory, strict sound channel usage, and hardware constraints.
This process requires technical precision and creativity to work within the NES's limitations while crafting new audio experiences.
4-Step Process for Adding Custom Music to NES ROMs
Required Tools and Setup
Software and Tools You'll Need
To create NES music that fits within the constraints of the 2A03 chip, you'll need to use either FamiTracker or FamiStudio. FamiTracker is a traditional tracker with a classic interface and a strong instrument system, making it a go-to choice for many professional NES homebrew developers. On the other hand, FamiStudio provides a more modern, user-friendly interface that feels similar to today's digital audio workstations (DAWs). Plus, its Windows installer takes care of major dependencies automatically.
For testing and verification, you'll need an NES emulator like FCEUX or Mesen. These tools are essential for checking memory usage and inspecting the Audio Processing Unit (APU). A hex editor will also come in handy for injecting your compiled music data into specific ROM memory locations and tweaking pointers as required. Additionally, the NSF Importer is useful for extracting NSF files, which can provide valuable insights into instrument patterns and composition techniques from original NES music.
To keep your project organized, create dedicated folders for different aspects of your work. Suggested folder names include: ROMs, Music_Source, Tools, Build, and Backups. Always start with a read-only version of the original ROM and make modifications on copies to avoid accidental overwrites.
If you're planning to put your music onto physical cartridges, services like BJ's Game Vault can help with custom game creation.
Finally, make sure your workflow aligns with legal guidelines to avoid any copyright issues.
Legal Considerations for ROM Usage
Before diving into game modifications, it's critical to understand the legal boundaries. Under U.S. copyright law, you should only work with ROMs that you've personally dumped from cartridges you own. Even if you legally own a game, downloading its ROM from the internet is a legal gray area that most experts recommend avoiding.
When sharing your work, distribute it as a patch file (such as IPS or BPS format) rather than a full ROM. This method allows others to apply your modifications to their own legally obtained backups without you distributing copyrighted game code. Additionally, document the specific game version you used and the tools involved in your process. This ensures others can replicate your setup legally and accurately.
Creating Custom Music with FamiTracker
Getting Started with FamiTracker
To dive into FamiTracker, head to famitracker.org and download the software. Extract the files into a dedicated folder on your Windows PC. There's no complicated installation - just double-click the executable to get started. If you run into issues, try running the program as an administrator or set compatibility mode to Windows 7.
Once the program is up and running, configure your audio settings by navigating to Module > Module Properties. Select the 2A03 chip, set the sample rate to 44,100 Hz, and adjust the buffer size to 512 samples. Save these settings as your default template for future projects.
The interface is divided into three key sections: the Order list (for organizing your song structure), the Pattern editor (where you input notes), and the Instrument list. In the Pattern editor, you'll see five columns corresponding to the NES sound channels: two pulse waves, one triangle wave, one noise channel, and a DPCM channel for samples. Press the spacebar to play or stop your composition.
To create your first instrument, click New Instrument in the instrument panel. In the instrument editor, enable the Volume, Pitch, and Duty checkboxes. For a basic lead sound, set a volume envelope that starts at 15 and decays to 0 over 8 steps. Experiment with duty cycle changes (12.5%, 25%, 50%, and 75%) to craft a richer tone. These sequences give your instrument a unique character while staying true to the NES hardware's limitations.
Composing for NES Hardware Limits
Now that FamiTracker is set up, it’s time to compose while keeping the NES hardware constraints in mind. Assign the pulse channels to melody and harmony, the triangle channel to bass lines, and the noise channel for percussion. Use arpeggio effects on the pulse channels to simulate chords by cycling through notes rapidly, creating the illusion of more complex harmonies. To manage the limited channels, alternate between melody and sound effects by inserting rests, and simplify intricate harmonies into dyads or single-note lines.
Exporting Your Music Files
Before exporting, clean up your project by removing any unused instruments and patterns to keep the file size small. Then, go to File > Export and choose the NSF format, which is compatible with emulators and NSF players. Make sure to select the appropriate NTSC/PAL mode (use NTSC for North American NES systems), enter your song title and author name, and specify the number of subsongs if your project includes multiple tracks.
While NSF is great for testing, integrating your music into an NES ROM might require additional steps. Some ROM hacking tools may need a raw binary export or have specific requirements, so be sure to check your toolset's documentation for details.
Finally, save both your original .ftm FamiTracker module file and the exported files in a dedicated Music_Source folder. Keep backups of your working versions as you refine your composition. Once exported, your music is ready to be integrated into an NES ROM.
Adding Custom Music to NES ROMs
Converting and Preparing Music Files
To integrate your NSF export from FamiTracker into a ROM, you'll need to convert it into a format compatible with your ROM hacking tools. Some tools can handle NSF files directly, but others require specific formats or raw binary data. Always check the documentation for your tools to confirm the required format.
If you're working with DPCM samples, make sure your source audio is in 8 kHz mono. Using higher sample rates or stereo files can lead to playback errors. For sound effects, keep them under 255 bytes and ensure they end with a C00 silence command to avoid glitches.
Before proceeding, test the converted file in an NSF player. Listen carefully for any issues like distortion, clipping, or timing errors. If you notice problems - such as crackling or incorrect duty cycles - re-export the file from FamiTracker and double-check the Volume, Pitch, and Duty settings in the instrument editor. Once your file plays correctly in the NSF player, you're ready to patch it into the ROM.
Patching Music into ROMs
Once your music file is ready, the next step is to insert it into the ROM. To do this, you’ll need a ROM hacking tool capable of accessing the game’s sound table. For example, FEBuilder is a popular choice for Fire Emblem ROM hacks. Before importing music, apply necessary patches like the Native Instrument Map and 16 Tracks 12 Sounds patches.
After applying the patches, open the Song Track editor and choose a song slot from the left panel. Use the Import music option to load your FamiTracker file. If the import is successful, the tool will display a success log. To assign your custom track to specific in-game events - like level themes or menu music - you’ll need to edit the game’s music table. This usually involves using a hex editor or an emulator’s memory viewer to adjust pointers that link songs to particular events.
Always test the ROM after patching. Load it in an emulator like FCEUX and trigger the in-game event where your music should play. If the game crashes or plays the wrong track, revisit your pointer assignments and check the import log for errors.
Working with ROM Memory Limits
After patching your custom music, managing the ROM’s memory limits is critical to maintaining the NES’s audio performance. NES ROMs have strict memory constraints, typically offering 32-512 KB of PRG-ROM space, with music data stored in free banks within the $8000-$FFFF range. A typical FamiTracker track uses 1-8 KB. Basic four-channel tracks require 2-4 KB, while DMC samples can add 4-16 KB each. The entire music engine and all tracks often need to fit within 16-32 KB due to mapper limitations.
To conserve memory, consider reducing your channel count to 3-4 melodic channels plus noise. Shorten loops, avoid DMC samples when possible, and use arpeggio effects to simulate chords without consuming extra space. If you’re replacing existing tracks, delete the originals using a hex editor to free up space. Use an emulator’s memory viewer to monitor your ROM’s memory usage and ensure you're staying within limits.
For larger projects, bankswitching with mappers like MMC3 can help. This allows you to store additional music data in separate banks that load as needed, making it possible to include unique background music for multiple levels.
sbb-itb-9a4764e
Testing and Troubleshooting
Testing Music in Emulators
Once you've patched your custom music, it's time to test it in an emulator to ensure everything works as expected. Open your ROM in an emulator like FCEUX or Mesen. Load the ROM through the emulator's menu and navigate to the part of the game where the music should play, such as the title screen or the first level. Save states can be a handy tool here, letting you quickly jump to the start of the track.
While testing, confirm that the correct track is playing instead of the original. Make sure all expected audio channels are active: two pulse channels, triangle, noise, and DMC (if you're using samples). Check that the song loops smoothly without cutting off or restarting unexpectedly. Also, keep an eye out for crashes or freezes during playback.
Before finalizing the ROM, use the emulator's memory viewer to ensure the NSF data remains intact. If the game crashes when the music starts, reload the ROM and use the "start" button to cycle through songs. Then, verify the NSF data in the memory viewer. These steps are crucial to ensure the music stays within the ROM's memory limits and performs reliably.
If you encounter issues, move on to the troubleshooting tips below.
Fixing Common Problems
Here’s a quick guide to solving frequent issues:
| Common Problem | Symptoms | Fixes |
|---|---|---|
| Crashes or freezes | Game freezes when music starts | Use nsf2data to check size; ensure effects end with C00. |
| Memory overflow | ROM won’t load or becomes corrupted | Reduce samples to 12 KB; monitor memory usage carefully. |
If some audio channels are missing, it’s often because you’ve exceeded the channel limits or accidentally muted a channel with effect commands. Double-check that only the allowed number of channels are active, and review your tracker patterns for any unintended volume or mute commands.
Distorted or noisy audio - especially on the DMC channel - can result from incorrect sample rates or samples that are too loud. To fix this, normalize and down-sample your audio to NES-compatible rates, then re-export and reinsert the music.
Pops or clicks happen when notes or samples start or end abruptly. To smooth things out, add short fades in your tracker's volume envelopes and ensure that DMC samples begin and end at zero crossings.
If the game crashes when a track starts, it might be due to bad pointers, corrupted data, or memory exceeding its allocated bank. Use the emulator's debugger and memory viewer to set a breakpoint at the code responsible for music playback. Step through the execution to find where the jump occurs. If the pointer points outside the expected music data bank, adjust your linker script, bank definitions, or pointer table to fix the issue.
How to Copy 8-Bit Nintendo Sounds and Music (NSF Importer + FamiTracker)
Conclusion
Adding custom music to NES ROMs is a fascinating blend of technical know-how and artistic creativity. In this process, you've explored the complete workflow: composing chiptune tracks using tools like FamiTracker or FamiStudio, exporting them as NSF or engine-compatible formats, integrating the music with a ROM's sound engine, and testing it all on emulators or actual hardware. Throughout, the limitations of the 2A03 sound chip - two pulse channels, one triangle, one noise, and one DPCM - play a significant role in shaping every musical decision.
When starting out, it’s best to experiment with simple test tracks using just a few channels. Once you’ve confirmed proper playback within the NES's constraints, you can gradually add complexity. Even small adjustments, like applying vibrato, arpeggios, or duty-cycle modulation, can make a big impact on the final sound. For DPCM samples, use them sparingly - many commercial NES games kept it to 1–3 samples per soundtrack to conserve ROM space.
Here are a few final tips for successful implementation: stay mindful of data limits, use FamiTracker sub-songs for effects that end with C00 silence, and double-check your patches with memory viewers in emulators to avoid overflows. Tackling challenges like memory constraints, channel conflicts, and export issues early on will save you time and frustration.
If you're more interested in enjoying custom ROM hacks rather than creating them, BJ's Game Vault is a great resource. They offer rare ROM hacks and custom cartridges for systems like the NES, SNES, N64, Sega Genesis, and GBA. These games are built on real physical cartridges, tested for retro consoles, and include exclusive fan-made titles - like custom NES games that highlight the creative potential of retro hardware. It’s a chance to see what’s possible when ingenuity meets classic gaming.
Whether you're composing your own soundtracks or exploring the work of others, the retro gaming community continues to redefine what these beloved systems can achieve. Dive in, experiment, and let your creativity shape the soundscapes of these timeless classics. The tools are ready, the community is welcoming, and the possibilities are as endless as your imagination - and the NES's memory.
FAQs
What legal factors should I consider when adding custom music to NES ROMs?
When working on NES ROMs to add custom music, it's important to keep copyright laws in mind. Most NES ROMs are still under copyright protection, and modifying or distributing them without proper authorization can lead to legal issues. To stay on the right side of the law, always use ROMs that you've obtained legally and avoid sharing any modified versions unless you have explicit permission to do so.
If you're uncertain about whether your modifications comply with copyright laws, it's a good idea to consult a legal expert. They can help ensure you're following U.S. copyright rules. Respecting intellectual property rights is a key part of engaging with retro gaming content responsibly.
How can I make sure my custom music works within the NES's memory limits?
When working with the NES, you're dealing with tight memory limits - just 64KB of CPU address space. That means your custom music needs to be as compact as possible. To make it fit, focus on compressing sound data, sticking to lower sample rates, and keeping your tracks short and efficient.
Keep waveforms simple, avoid overly complex loops, and include only the most essential tracks. Careful editing and thorough testing are key to staying within these constraints while still delivering quality sound.
What should I do if adding custom music makes my NES ROM crash?
If your custom music is making the NES ROM crash, the first step is to confirm that the file format is compatible and the music data is properly structured. Double-check that the sample rate aligns with the system's requirements. Additionally, overly complex or lengthy tracks can strain the system's memory, so keep the composition manageable.
Another troubleshooting method is to test the ROM with various tracks to identify any specific files causing issues. If you find a problematic track, consider simplifying or re-encoding it to reduce the load on the system. These small tweaks can often resolve crashes and ensure smoother performance.