


Ultimate Guide to Cooling Retro Consoles
Retro consoles like the NES, SNES, Sega Genesis, and N64 can overheat, leading to hardware damage and reduced lifespan. Without proper cooling, components like voltage regulators and capacitors may fail, causing shutdowns, graphical issues, or sluggish performance. Here's how to avoid these problems:
- Clean Dust Regularly: Dust clogs vents and traps heat. Use compressed air and isopropyl alcohol for internal cleaning.
- Proper Placement: Keep consoles on flat surfaces with 4–6 inches of ventilation space. Avoid direct sunlight and heat sources.
- Check Power Supplies: Ensure the power supply matches the console's specs to avoid excess heat generation.
- Upgrade Hardware: Add heat sinks, replace thermal paste, or install aftermarket fans for better cooling.
- Monitor for Overheating Signs: Hot casing, glitches, or sudden shutdowns signal cooling issues.
Taking these steps will keep your retro consoles running smoothly and protect them from heat-related damage.
How to add the ultimate cooling upgrades to your original Xbox console. OG Xbox restore tutorial
Basic Maintenance for Better Cooling
Taking care of your retro console is key to keeping it cool and running smoothly. The three main areas to focus on are dust removal, proper placement, and power supply health. Let’s break down how to handle each of these.
Cleaning Dust and Debris
Dust is the number one enemy of retro consoles when it comes to overheating. Over time, dust can clog vents and fans, making it harder for the system to stay cool. When cleaning, use compressed air and aim parallel to the vents to blow out dust without forcing it deeper inside.
If your console has been stored in a less-than-ideal environment, you might need to open it up to clean the inside and check for any hardware issues, like leaking capacitors. For internal cleaning, grab some 99% isopropyl alcohol and a soft toothbrush. Gently dip the brush in the alcohol and use light pressure to clean the motherboard.
"Store your consoles in open areas with plenty of space between their fan vents and any shelving or walls. Don't stack them or place them next to windows, heating vents or other devices." - Brendan Hesse, Freelance Writer, Lifehacker
While cleaning, keep an eye out for swollen or leaking capacitors. These often show up as yellowish-brown residue and are common in pre-2000 consoles, potentially leading to heat-related problems. A basic cleaning kit - complete with paper towels, cotton swabs, a soft toothbrush, and isopropyl alcohol - costs around $20. Avoid using damp towels, wipes, or household cleaners on your console, as moisture can seep into the vents and cause electrical damage.
Where to Place Your Console
Where you set up your console plays a big role in how well it can manage heat. Make sure there’s 4 to 6 inches of open space around the vents to allow for proper airflow. Never place your console on soft surfaces like carpets or rugs, which can block airflow, and avoid storing it in enclosed spaces like cabinets where heat can build up.
Keep your console out of direct sunlight and away from heating vents. External heat sources can make overheating worse. Plus, sunlight can cause the plastic casing to yellow over time due to bromine oxidation. Always place your console on a hard, flat surface to reduce the risk of tipping over, which can lead to hardware damage.
Checking Power Supplies
The power supply is often overlooked but can be a major source of heat in retro consoles. For example, in the NES-101, the voltage regulator and its heatsink generate a lot of heat. Tests showed the voltage regulator area reaching 116.8°F, and the rectifier area hitting 114.5°F after just one hour of use.
To minimize heat, use an adapter that matches your console’s original specifications - like a 9V AC adapter for the NES. A multimeter set to DC mode can help you check if the power supply is delivering the correct voltage. If your console shuts down shortly after turning on, inspect the voltage regulator and make sure the heatsink is clean and securely attached.
Hardware Cooling Modifications
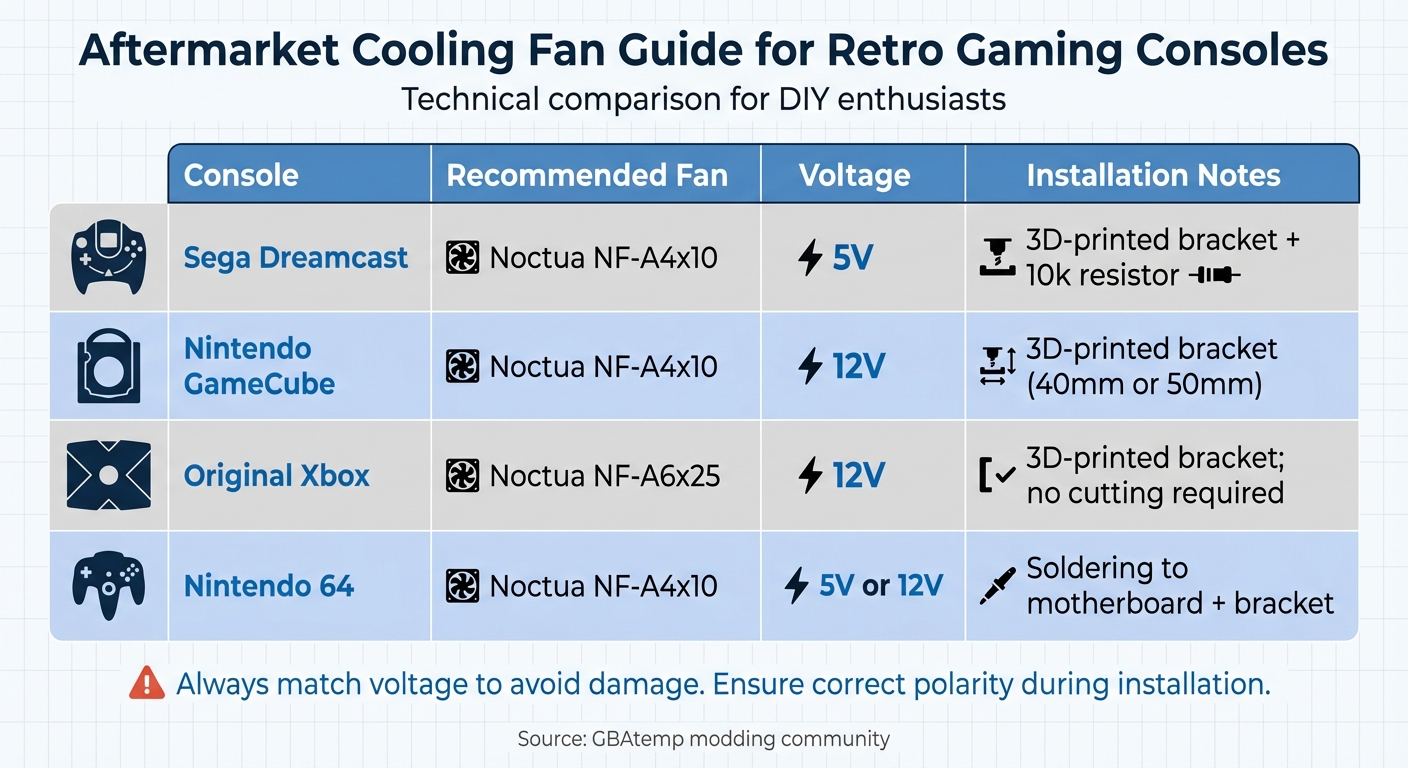
Aftermarket Cooling Fan Guide for Retro Gaming Consoles
When basic maintenance isn't cutting it, hardware upgrades can help keep your console cool and running reliably. These changes require some technical know-how, but they can make a noticeable impact on temperature control.
Installing Aftermarket Fans
Switching to aftermarket fans, like those from Noctua, can improve cooling while keeping noise levels down. However, it's important to match the fan's voltage to your console. For instance, the PS2 uses a 7V fan, while the GameCube and Xbox require 12V. Using the wrong voltage can lead to poor performance or even damage your console.
For consoles like the Nintendo 64, which originally came without a fan, adding a Noctua A4x10 can dramatically reduce internal temperatures - especially useful if you're running overclocked games. To power a 12V fan in the N64, you can connect it to the capacitor labeled "33 EHA 7F7" on the top-right of the motherboard. The right leg of this capacitor provides the necessary 12V.
"Many people are too fixated on the quietness of the fan and end up ignoring the more important details by replacing the original fans... with a low CFM/rpm fan... and what this does is it ends up performing worse than the original." – iVirtualPlays, GBAtemp Guide Author
Aftermarket fans often don't match the original fan's size, so you'll need 3D-printed brackets to secure them. For example, the Dreamcast requires an adapter with a 10k resistor to ensure the console correctly detects the fan signal. If you're modding an Xbox with a Noctua A6x25, you might need to tweak fan speed settings in a custom BIOS or dashboard to optimize airflow.
Before replacing the original fan, try refurbishing it with 99% isopropyl alcohol and gear grease to reduce noise. If you do replace the fan, use superglue for mounting, as hot glue can melt at temperatures between 104–122°F.
| Console | Recommended Fan | Voltage | Installation Notes |
|---|---|---|---|
| Sega Dreamcast | Noctua NF-A4x10 | 5V | 3D-printed bracket + 10k resistor |
| Nintendo GameCube | Noctua NF-A4x10 | 12V | 3D-printed bracket (40mm or 50mm) |
| Original Xbox | Noctua NF-A6x25 | 12V | 3D-printed bracket; no cutting required |
| Nintendo 64 | Noctua NF-A4x10 | 5V or 12V | Soldering to motherboard + bracket |
Once you've upgraded the fans, the next step is to improve heat transfer with better heat sinks.
Heat Sink Upgrades
Heat sinks help dissipate heat by increasing the surface area available for cooling. Upgrading the thermal interface material (like pads or paste) can often make a bigger difference than replacing the heat sink itself. High-performance thermal pads, such as those from Thermalright (12.8 W/mk rating), are a solid choice.
For the NES-101 (Top Loader), adding small aluminum heat sinks with thermal grease can lower operating temperatures by 10–12°F, bringing it down from 112°F to around 101°F. These heat sinks are affordable, typically costing between $7.00 and $11.00.
If you're replacing thermal pads - common for consoles like the PS2 or Dreamcast - make sure to measure the original pad thickness, which usually ranges from 0.5mm to 2.0mm. Proper thickness ensures good contact without bending the motherboard. Avoid stacking thermal pads, as this can trap air bubbles and reduce cooling efficiency. For the Nintendo 64, thermal pads are preferable to paste because they last longer and fit the console's heat sink mounting better.
If you're dealing with an Original Xbox GPU stuck with old thermal material, use a hairdryer or heat gun on low heat to soften the bond before removal. Always clean the surfaces with 99% isopropyl alcohol before applying new thermal material.
For consoles that need even more cooling power, custom solutions can take things a step further.
Custom Cooling Solutions
To tackle heat at its source, consider externalizing the power supply or upgrading voltage regulators. Moving the power supply outside the console - using "Pico PSU" kits - removes a major heat source from inside the shell. This is particularly effective for consoles like the Sega Dreamcast, Saturn, PlayStation 1, and Nintendo 64.
Another option is upgrading the voltage regulator. Replacing the original 7805 linear regulator with a high-efficiency switching regulator can significantly reduce heat generation. Drop-in replacements cost around $10, while DIY components can be as low as $4. Without proper heat sinking, a 7805 regulator can hit 205°F in seconds.
For the Xbox 360, you can improve airflow by covering the top of the CPU/GPU heat sinks with aluminum foil to create a makeshift shroud. This forces air to flow through the fins more effectively. However, adding extra fans to early Xbox 360 models won't fix the infamous "Red Ring of Death" - that issue stems from defective GPU chips, not poor airflow.
The great thing about most custom cooling solutions is that they are reversible. You can return your console to its original condition if needed, making these modifications a flexible option.
sbb-itb-9a4764e
Maintaining Original Console Appearance
Preserving your console's original design is especially important for collectors. The good news? Many effective cooling upgrades can be done internally, so the console's look remains untouched.
External Cooling Methods
You can improve airflow by placing your console in an open area, ensuring vents have plenty of clearance, and keeping the room temperature between 40°F and 95°F. Avoid placing the console on soft surfaces like carpets, as these can block airflow.
Be cautious with external clip-on fans. They can sometimes misdirect airflow or put extra strain on the power supply. If you decide to use one, opt for a fan with its own power source that doesn’t require permanent mounting. For long gaming sessions, it’s a good idea to let your console rest for at least an hour after 5–6 hours of continuous play.
While external solutions can give a small boost to airflow without altering the console, internal upgrades offer better cooling while keeping the vintage look intact.
Reversible Modifications
Some internal modifications not only improve cooling but are also fully reversible, meaning they won’t leave any permanent marks.
- Thermal Paste Replacement: Replacing old thermal paste can restore factory cooling performance. A quality tube of thermal paste costs around $24.95 and can be reapplied or removed as needed.
- Internal Chip Heat Sinks: Adding heat sinks to components like the CPU and PPU is another effective option. Testing on an NES-101 showed these heat sinks could lower temperatures by 10–12°F. Since they’re attached with thermal grease - not permanent adhesive - they can be removed without leaving a trace.
- Switching Regulator: Replacing the 7805 regulator with a modern switching regulator reduces internal heat. These drop-in regulators cost about $10 and don’t require altering the console’s shell.
Here’s a quick overview of reversible modifications that enhance cooling while keeping your console’s original look intact:
| Modification | Reversibility | Impact on Appearance |
|---|---|---|
| Thermal Paste Replacement | Fully Reversible | None |
| Internal Chip Heat Sinks | Fully Reversible | None |
| Switching Regulator | Fully Reversible | None |
| External Vent Fans | Fully Reversible | Minimal (External only) |
| Drilling Vent Holes | Non-Reversible | High (Permanent damage) |
It’s best to avoid destructive changes like drilling vent holes or cutting the case for extra fans. Research shows these are rarely necessary - internal heat management solutions are more effective and preserve the console’s classic appearance.
Recommended Products and Tools
After following the cleaning and modification steps we’ve outlined, these recommended products and tools can help keep your retro console running cool and reliable. The right tools make maintenance easier and protect your vintage hardware from unnecessary wear and tear.
Cleaning and Maintenance Tools
For cleaning, 90%+ isopropyl alcohol is a must - it evaporates quickly and leaves no residue. A basic cleaning kit should include isopropyl alcohol, cotton swabs, a soft toothbrush, and paper towels. If you need to tackle stubborn residue, GooGone spray gel is a safe option for plastic surfaces.
Opening your console requires specific tools. For most Nintendo and Sega systems, you’ll need 3.8mm and 4.5mm Gamebit screwdrivers to access internal parts. To clear out dust effectively, use compressed air or an electric duster. As RetroRGB explains, “The less dust that's covering them, the cooler the components will run”. For cleaning cartridge contacts, a vinyl or plastic eraser works well to remove oxidation.
Cooling Accessories and Components
To improve your console’s cooling performance, consider adding specific components. Replacing the original 7805 voltage regulator with a switching regulator is a simple upgrade that costs about $10 and noticeably reduces internal heat. Installing small heat sinks on CPUs and PPUs, secured with thermal grease, can lower temperatures by 10–12°F.
For aftermarket cooling, Noctua and Kingwin offer reliable fan options. The Noctua NF-A8 PWM (80mm) boasts a 4.9/5 rating from over 2,100 Amazon reviews, while Kingwin silent fans start at $5.99 and have a 4.5/5 rating from more than 4,600 reviews. If your console was made before 2000, consider investing in capacitor replacement kits (priced between $15 and $20) to prevent potential damage from leaking electrolytes.
Retro Gaming Products from BJ's Game Vault

For easy system upgrades, check out the offerings from BJ's Game Vault. They provide retro-tested accessories and custom cartridges tailored for original hardware. Every product includes a Collector's Guarantee, ensuring it has been tested on authentic consoles. Plus, BJ's Game Vault offers free shipping and Vault Support, with experienced gamers ready to assist with compatibility questions. Whether you're looking for custom cartridges or cooling accessories, their products are designed to enhance performance while preserving the classic charm of your collection. These curated items align perfectly with the cooling strategies shared above, helping you maintain both functionality and vintage appeal.
Conclusion
Keeping vintage hardware cool is essential to prevent damage that could permanently sideline your retro consoles. As Mark Gallina, System Thermal & Mechanical Architect at Intel, notes:
"Intel® CPUs have very robust thermal management features that quickly adjust operating frequencies to reduce power when the system cooling solution is insufficient".
Unlike modern systems, older consoles lack these advanced safeguards, making proactive cooling measures a must. This guide has highlighted that a mix of regular maintenance and thoughtful upgrades is the key to preserving these nostalgic machines.
Most overheating issues can be avoided with simple upkeep. Regularly using compressed air to clear out dust, keeping your console away from heat sources, and replacing dried-out thermal paste are straightforward ways to restore its cooling efficiency. If your console was made before 2000, pay special attention to leaking capacitors - excessive heat can speed up the breakdown of electrolytic gel, potentially damaging the circuit boards.
For those looking to go beyond basic maintenance, hardware upgrades provide an extra layer of protection. These upgrades are often affordable and can make a noticeable difference in reducing heat output while extending the console's lifespan. The best part? You can often make these improvements without altering the console's original look and feel.
Start with the essentials: clean the vents, check the placement, and watch for signs of trouble. Whether you handle these tasks yourself or rely on professional services, taking action now ensures your gaming memories - and your console's value - are preserved. As VideoGame911 warns:
"Prolonged overheating can lead to hardware failure, so don't wait too long".
Your retro consoles have already stood the test of time. With proper cooling and care, they’ll be ready for countless more gaming sessions ahead.
FAQs
How can I tell if my retro console is overheating?
Overheating in retro consoles often shows up in both physical and performance-related ways. You might feel the console's case or vents becoming unusually warm - some models have even been recorded reaching over 115°F after prolonged use. Dust clogging the vents or a fan that's louder than usual can indicate restricted airflow, causing heat to build up quickly. If your console is in a cramped or poorly ventilated spot, the surrounding air might also start to feel warmer.
On the performance side, overheating can trigger issues like lagging, freezing, visual glitches, or even sudden shutdowns or restarts during long gaming marathons. If these problems keep happening, it’s a clear sign your console is struggling to manage its internal temperature, which could lead to permanent damage over time. To avoid this, make sure to clean the console regularly, ensure it has proper ventilation, and take breaks during extended gameplay sessions.
What’s the safest way to clean the inside of my retro console?
To clean the inside of your retro console safely, start by turning it off and unplugging all cables. Carefully take the console apart using the right tools. Most consoles require a Phillips screwdriver, but models like the SNES or N64 might need a specialized Gamebit tool. Keep the screws in a small container to avoid misplacing them.
Use compressed air or an electric duster to gently blow away loose dust from the circuit board, fan, and other internal parts. For tougher grime, lightly clean the surfaces with a lint-free cotton swab dipped in 90% or higher isopropyl alcohol. Steer clear of water, acetone, or lower-concentration alcohol, as these can harm the console. Make sure everything is completely dry before putting it back together. Once reassembled, test the console with a quick game to confirm it’s functioning properly.
Always work in a well-ventilated space, wear an anti-static wrist strap if you have one, and handle components by their edges to avoid static damage.
Are there any temporary cooling solutions for retro gaming consoles?
Most cooling upgrades for retro gaming consoles tend to be permanent modifications. These include swapping out the original fans, applying higher-quality thermal paste, or even modifying the console's casing. These methods usually involve opening up the console and making changes that can't easily be reversed.
On the other hand, there seems to be a lack of resources or guides for non-permanent options. External USB fans, clip-on coolers, or cooling pads - solutions that don’t require altering the console - aren’t widely documented. As it stands, most cooling improvements for retro consoles focus on permanent hardware changes.