


Advance Map: Tool for Custom GBA Maps
Advance Map is a Windows-based tool designed for editing Pokémon GBA ROMs like FireRed, LeafGreen, Ruby, Sapphire, and Emerald. It allows users to create and modify maps, manage events, adjust wild Pokémon encounters, and more. Its user-friendly interface includes tabs for map design, movement permissions, and event scripting, making it a go-to for ROM hacking enthusiasts. Key features include:
- Map Editing: Design towns, forests, caves, and more using a tile-based interface.
- Movement Permissions: Define walkable areas, water tiles, and elevation changes with hex codes.
- Events Management: Add warps, NPCs, signposts, and scripts to make maps interactive.
- Wild Pokémon Configuration: Set encounter rates and species for various terrains.
- ROM Compatibility: Works with all language versions and supports extended ROMs up to 32MB.
To get started, download version 1.95 from trusted sources, extract the files, and back up your ROM before editing. Advance Map also integrates with tools like XSE for scripting, allowing seamless customization. Once your project is ready, services like BJ's Game Vault can turn your ROM hacks into physical GBA cartridges for play on original hardware.
Installing and Setting Up Advance Map
Downloading Advance Map
To get started, download Advance Map version 1.95 from trusted sources like ROMhacking.net or HackRomTools.info. This version is reliable for most projects, even though some tutorials might mention older versions like 1.92 or 1.82.
The download will typically come in a compressed format like .7z or .rar, so you’ll need extraction software such as 7-Zip or WinRAR to open it. If you’re downloading from HackRomTools.info and encounter a password-protected file, use "HackRomTools" as the password. After extracting the files, make sure to keep everything in the same folder - this helps prevent errors later.
Once the files are ready, you’ll need to check your system requirements and complete the initial setup to start editing.
System Requirements and Initial Setup
After downloading and extracting Advance Map, the next step is setting it up on your Windows system. Proper setup ensures smooth map editing and avoids potential hiccups.
Advance Map is designed exclusively for Windows and works with all GBA Pokémon games, including Ruby, Sapphire, Emerald, FireRed, and LeafGreen - regardless of the language version. If you’re a beginner, it’s best to start with FireRed or LeafGreen, as Emerald has been reported to be less stable.
One important tip: always back up your ROM. When you load a ROM into Advance Map, the program automatically creates a .bak file. To restore the original version, simply rename this file with a .gba extension.
To load your ROM, open Advance Map, go to File > Load ROM, and select your GBA file. Expect a short pause as the program processes the file - this is completely normal.
Once the ROM is loaded, adjust your settings for an optimal editing experience. Go to Settings > Viewing size and check all the available boxes to ensure the map interface displays correctly. For easier navigation, switch to the "Sort by Map Name" option in the header view instead of sorting by map bank.
Advance Map Tutorial 1 (Beginner) - Part 1
Understanding the Advance Map Interface
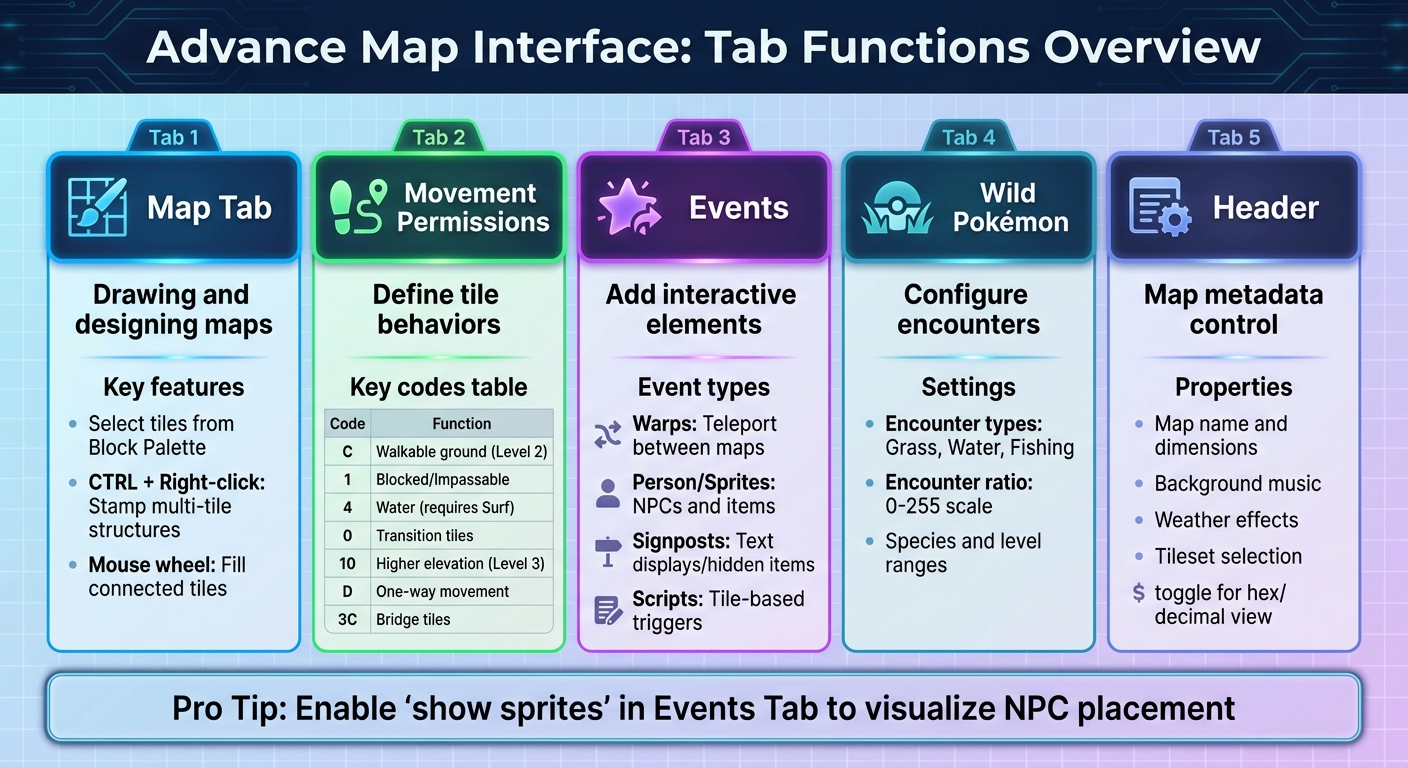
Advance Map Interface Tabs and Functions Quick Reference Guide
After successfully loading your ROM, the workspace in Advance Map is divided into three main sections: the left panel for the map list, the central canvas for designing maps, and the right Block Palette, where you can pick tiles for your map.
The interface uses a tab system to organize different editing tasks. Here's a quick rundown of what each tab does:
- Map Tab: The primary area for drawing and designing maps.
- Movement Permissions Tab: Sets where players can walk, surf, or encounter barriers using numerical codes.
- Events Tab: Manages interactive elements like warps, NPCs, signposts, and scripts.
- Wild Pokémon Tab: Configures encounter types for grass, water, and fishing zones.
- Header Tab: Contains map metadata such as name, dimensions, background music, weather settings, and tileset selection.
Just above the Block Palette, you'll find the Border Block field. This determines what tiles appear at the edges of your map - typically used for trees, mountains, or similar boundary visuals.
Now, let’s dive deeper into how these tabs work and what you can accomplish with them.
Main Tabs and Their Functions
The Map Tab is where most of the action happens. You can select tiles from the Block Palette and place them directly onto the map canvas. Want to save time? Hold CTRL and right-click to stamp multi-tile structures. You can also use the mouse wheel button to fill connected tiles with the same block.
The Movement Permissions Tab assigns numerical codes to tiles, defining their behavior. For example, codes indicate whether a tile is walkable, blocked, water-based, or part of a special transition.
In the Events Tab, you’ll handle interactive elements. These are categorized into:
- Warps: For moving between maps.
- Person/Sprites: For NPCs and items.
- Signposts: For text displays or hidden items.
-
Scripts: For tile-based triggers.
Enable the "show sprites" option to replace placeholders with actual NPC images, making it easier to visualize your layout.
The Wild Pokémon Tab allows you to configure Pokémon encounters for grass, surfing, and fishing areas. Encounter ratios are set on a scale of 0–255.
The Header Tab is where you control key map properties. This includes the map's name, dimensions, background music, and weather effects. A handy feature in version 1.95 is the addition of a "$" toggle in text fields, letting you switch between hexadecimal and decimal views for easier data entry. Other tools, like the Connection Editor and World Map Editor, help you create smooth map transitions, set town locations, and adjust "Flying" flags for the region map.
Creating a New Map
Once you’re familiar with the interface, you’re ready to create your own custom map.
To get started, go to File > Map > New Map. Enter a name for your map and set its dimensions based on the type of location you’re designing. Here’s a quick reference for typical map sizes:
| Place Type | Usual Width | Usual Height |
|---|---|---|
| Rooms | 13 | 10 |
| Towns | 24 | 20 |
| Cities | 48 | 40 |
| Caves | 48 | 40 |
| Forests | 54 | 69 |
For example, rooms are usually 13×10, while cities or caves are better suited to 48×40. The maximum map size for FireRed is 70×106.
Next, choose Tileset 1 and Tileset 2 to define the graphics and blocks available in your Block Palette. Once ready, click Insert Map and assign it to a Map Bank. Major areas are often stored in Bank 3. Before proceeding, make sure to create a backup of your ROM to avoid losing progress.
sbb-itb-9a4764e
Editing Maps: Movement Permissions and Events
Setting Movement Permissions
The Movement Permissions tab lets you assign numerical codes to tiles, determining how players interact with them. These codes define whether a tile is walkable, an obstacle, or something more specific like water or a bridge.
To use this feature, select a code from the palette on the right and apply it to the desired tiles. The most frequently used code is C, which represents standard walkable ground (Level 2). For areas players can't pass, such as walls or trees, use code 1. Water tiles are assigned code 4, requiring the player to have Surf to cross them.
For more complex scenarios like elevation changes or bridges, use the following codes:
- 10: Higher elevation tiles (Level 3).
- 0: Transition tiles for moving between levels (essential for stairs or elevation changes).
- 3C: Used for bridge tiles, allowing movement from above and below. Pair this with 10 at bridge entrances and exits, and set the tile behavior to 08 00 for bridges over land or 70 00 for bridges over water.
Here's a quick reference for movement codes:
| Movement Code | Effect |
|---|---|
| C | Walkable ground (Level 2) |
| 1 | Blocked/Impassable (e.g., walls, trees) |
| 4 | Water (requires Surf) |
| 0 | Transition tiles (used for stairs/elevation changes) |
| 10 | Higher elevation walkable ground (Level 3) |
| D | One-way movement (e.g., ledges) |
| 3C | Passable from above and below (used for bridges) |
You can use the middle mouse button like an eyedropper tool to copy movement permissions directly from the map. This is especially helpful when you need to replicate permissions across multiple tiles quickly.
Once you've set up movement permissions, your map will be ready for gameplay. The next step is to add interactivity using events.
Adding Events Like Warps, Trainers, and Signposts
With movement permissions in place, you can bring your map to life by adding events. The Events tab allows you to include interactive elements like Warps, Person events (NPCs or sprites), Signposts, and Scripts.
To add an event, increase the value in the "Number of..." box for the event type you want, then click Change Events. This will generate new event icons at the top-left corner of your map, which you can drag to their intended positions.
- Warps: These transport players to different maps or locations. You'll need to define properties like Map Bank, Map No, and To Warp No for the destination. Set the tile behavior byte to 61 00 for standard warps or 69 00 for door warps. The "Unknown" property is usually 3 for doors and caves or 4 for ladders. Use the Follow Warp button to test destinations.
-
Person events: These are used for interactive overworld sprites like NPCs, items (e.g., Poké Balls), or obstacles. Key properties include Picture No (sprite image), Movement Type, and Script Offset. For trainers, set a View Radius to determine how far they can "see" the player to initiate battles. The Person ID links the sprite to game flags, so you can make them disappear or reappear using
setflagandclearflagcommands in scripts. - Signposts: These can display text, reveal hidden items, or act as secret bases. The Talking Level property determines the interaction direction, while Signpost Type specifies whether it's a Script, Hidden item, or Secret base. For hidden items, you'll need to define an Item ID and Amount.
| Event Type | Function | Key Properties |
|---|---|---|
| Warps | Teleports players to another map or location | Map Bank, Map No, To Warp No, Unknown (3 for doors, 4 for ladders) |
| Person | Adds NPCs, items, or obstacles | Picture No, Movement Type, Script Offset, Trainer Checkbox, View Radius |
| Signposts | Displays text or hides items | Talking Level, Signpost Type, Item ID (for hidden items) |
| Scripts | Triggers events when stepping on a tile | Script Offset, Var Number, Var Value |
Before making changes, always back up your ROM to avoid losing progress. If a warp isn’t functioning, double-check the tile's behavior byte - this is a common issue. For NPC movement, use the "Movement" field in Person event properties with hexadecimal YX values, where Y controls vertical range and X controls horizontal range.
These tools allow you to create maps that are not only visually appealing but also interactive and engaging, giving players a polished and immersive experience.
Advanced Features and Customization Options
Once you've mastered the basics of map editing, these advanced tools can help you fine-tune gameplay and presentation to make your project truly stand out.
Configuring Wild Encounters
The Wild Pokémon tab lets you define the species, level ranges, and encounter rates for different terrains such as Grass, Water, or Fishing. By adjusting the percentage slots, you can control how often specific Pokémon appear, striking the right balance between common and rare encounters.
The Encounter Ratio determines how frequently battles occur with each step. Tweaking this value allows you to set the tone for each area, whether you want it to feel more relaxed or action-packed. Here's how the slot distributions break down:
| Encounter Type | Slot Distribution |
|---|---|
| Grass (12 slots) | 20%, 20%, 10%, 10%, 10%, 10%, 5%, 5%, 4%, 4%, 1%, 1% |
| Water (5 slots) | 60%, 30%, 5%, 4%, 1% |
| Old Rod | 70%, 30% |
| Good Rod | 60%, 20%, 20% |
| Super Rod | 40%, 30%, 15%, 10%, 5% |
For a natural progression, assign rare Pokémon to lower-percentage slots (like 1% or 5%) and keep common Pokémon in higher-percentage slots (20% or more). This approach ensures that players encounter familiar species often while keeping the thrill of discovering rare Pokémon alive.
Saving and Exporting Custom Maps
Before making any changes, always back up your ROM. In case something goes wrong during saving, locate the .bak file in your ROM folder and rename it back to .gba to restore your previous version.
To avoid overwriting existing data, ensure Automatic Offset search is enabled in your settings (this is usually on by default in newer versions). If you're using Advance Map version 1.90, avoid the Resize function, as it has a known bug that can corrupt ROM data. Instead, use version 1.91 or later for safer resizing options.
If you need to remove a map, don't delete it outright. Instead, repurpose it by altering its size, tilesets, and properties. Deleting a map can lead to errors or data corruption, particularly if the map isn't located at the end of a map bank. Should Advance Map seem unresponsive while loading your ROM, give it extra time to process the data.
When connecting maps, make sure both maps have reciprocal entries with the correct map bank and number. For border tiles, stick to those in the first part of the tileset to avoid mismatched visuals in-game.
Once you're satisfied with your custom maps, you can export them and even bring your digital creation into the physical world.
Custom Game Creation Services at BJ's Game Vault
For those looking to take their projects to the next level, BJ's Game Vault offers a unique service: turning your ROM hacks or original designs into physical Game Boy Advance cartridges. These cartridges are fully compatible with original GBA hardware, giving you a tangible version of your creative work.
This is an excellent option for creators who want to see their designs come to life on actual hardware or share physical copies with friends and fellow retro gaming fans. BJ's Game Vault also specializes in rare ROM hacks and reproduction titles, making them a go-to resource for Advance Map users. With free shipping and responsive customer support, turning your custom GBA game into a cartridge is a seamless and rewarding process.
Conclusion
With over 33,647 downloads, Advance Map stands out as a powerful tool for creating and customizing maps. Its tabbed interface gives users precise control over tile placement, movement permissions, event scripting, and wild encounters.
These features allow for detailed and accurate map customization. Whether you're tweaking encounter ratios (measured as a chance out of 255), configuring warp tiles with the correct behavior byte (61 00), or designing towns with the standard 24×20 dimensions, Advance Map provides the flexibility to bring your creative ideas to life. To ensure a smooth editing process, always back up your ROM before making changes and use version 1.92 or later for a more stable and reliable experience.
Once your custom maps are complete, they don’t have to remain locked in the digital realm. Services like BJ's Game Vault can transform your ROM hacks into physical GBA cartridges, compatible with original hardware. This unique option bridges the gap between digital creativity and the nostalgia of retro gaming, allowing you to hold your custom game in your hands or share physical copies with others in the community.
FAQs
How can I safely back up my ROM before using Advance Map?
Before diving into ROM editing with Advance Map, taking a moment to back up your file can save you from losing progress or damaging the original. Here's how to do it: use a cartridge-dumping device like a GBxCart to extract a clean ROM from your physical GBA cartridge. Just connect the device to your computer, insert the cartridge, and run the dumping software to save the ROM as a .gba file.
After saving the ROM, make an extra copy and store it somewhere secure - an external drive or cloud storage works great. To stay organized, label the file clearly, such as PokemonFireRed_backup_12-21-2025.gba. Always edit a separate copy of the ROM, not the backup. This way, if something goes wrong, you can easily revert to the original. Taking this precaution makes your map editing process much safer and stress-free.
What’s the difference between town and cave maps in Advance Map?
Towns and caves in Advance Map are crafted with distinct purposes, which directly impact their size and overall design.
Towns are generally compact, measuring about 24 tiles wide by 20 tiles high, reflecting their open and outdoor nature. In contrast, caves are significantly larger, around 48 tiles wide by 40 tiles high, allowing for intricate layouts with winding paths and multiple chambers. Even the borders set them apart - towns often feature grass or road tiles, while caves use rock or cave-wall tiles to emphasize their enclosed, underground atmosphere.
These design choices also shape how players experience the game. Towns are hubs for interacting with NPCs and accessing various services, while caves are designed for exploration, puzzles, and battles, offering a more confined and adventurous gameplay environment.
How can I turn my custom GBA ROM into a physical cartridge?
To bring your custom Game Boy Advance (GBA) ROM to life on a physical cartridge, you’ll need two key tools: a GBA flash cart and a flash-linker device. The flash cart acts as a rewritable cartridge to store your ROM, while the flash-linker allows you to transfer the ROM from your PC to the cartridge. Once everything is set up, you can play your creation on an actual GBA console.
Here’s how the process works:
- Get a GBA flash cart: Make sure it has enough storage to fit your ROM. Most games require around 32 MB of space.
- Set up the flash-linker: Connect the flash cart to your PC using the flash-linker and install any necessary software.
- Load your ROM: Open the software, upload your custom ROM, and confirm it fits the cart’s storage capacity.
- Write and test: Transfer the ROM to the cartridge, then pop it into your Game Boy Advance or GBA SP to ensure everything works as intended.
Using these tools, you can take your homebrew games or custom maps off the screen and onto real hardware, adding an authentic touch to your retro gaming adventures.