


Best Practices for Backing Up Retro Game Data
Your retro game saves are at risk. Cartridges degrade, batteries die, and discs fail over time. If you’ve ever poured hours into completing a Pokédex or finishing an RPG, you know how irreplaceable those memories are. Backing up your game data ensures you don’t lose progress due to hardware failure.
Here’s what you need to know:
- Cartridge batteries fail after 15–20 years, especially in Game Boy Advance games.
- Dust and oxidation can corrupt data during backups. Clean contacts with isopropyl alcohol before starting.
- Use tools like GBxCart RW or RetroBlaster to extract ROMs and save files.
- Follow the 3-2-1 rule: keep 3 copies on 2 types of storage, with 1 off-site.
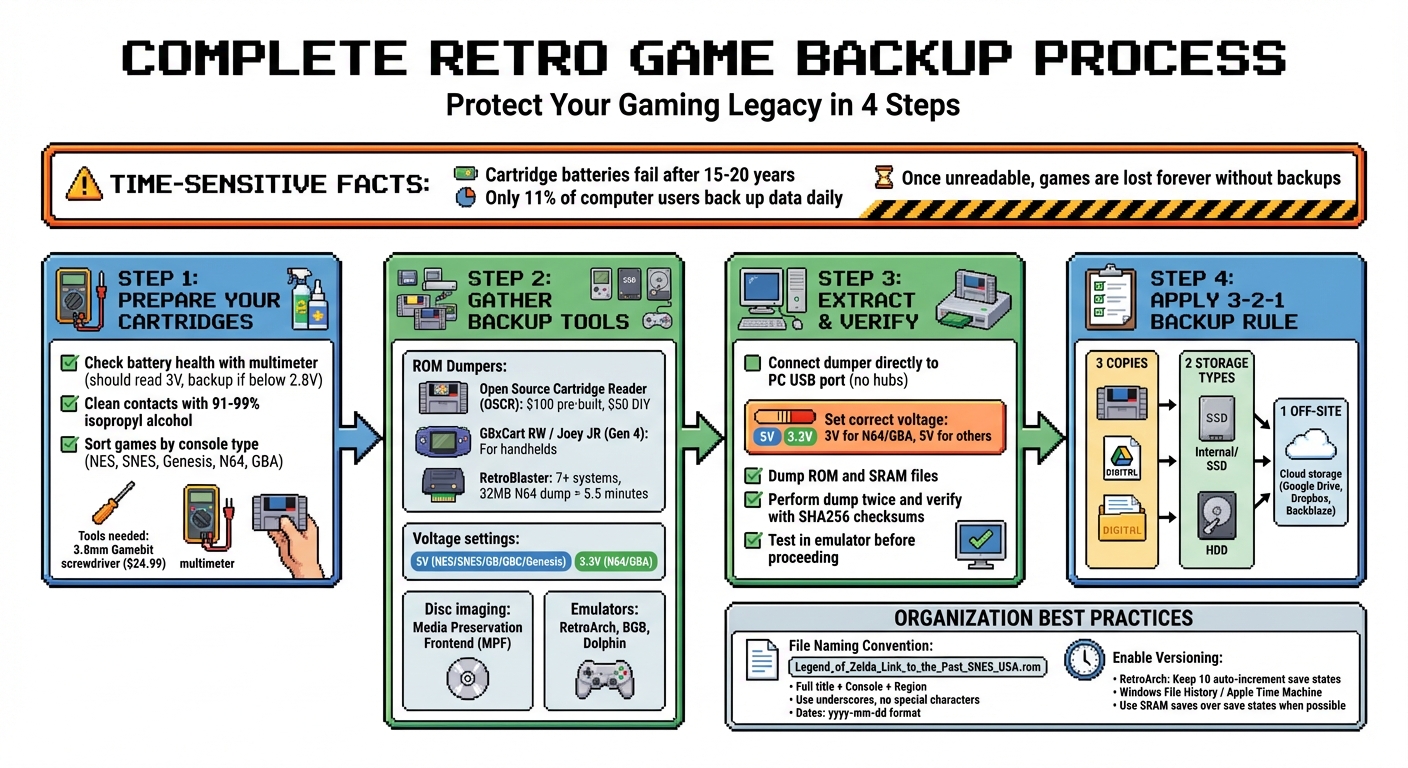
Complete Retro Game Backup Process: 4-Step Guide with 3-2-1 Rule
How To Make Roms // Back Up Retro Games and Saves * Tutorial *
Preparing Your Cartridges and Equipment for Backup
Getting your cartridges ready is a crucial step to avoid issues like corrupted backups or read errors. By following these steps, you can ensure a smoother process when backing up your data.
Check Cartridge Battery Health
Many NES, SNES, and Game Boy cartridges rely on battery-powered SRAM to store save data. These batteries, often CR2032 or CR2025 coin cells, should ideally read about 3V when tested with a multimeter. If the voltage drops below 2.8V, the battery is nearing failure, putting your saved data at risk.
"If your game no longer saves, it is typically a battery problem." - jaksherry, Author, Instructables
To check the battery, you’ll need a 3.8mm Gamebit screwdriver (available for $24.99) and a multimeter set to DC voltage. Touch the multimeter probes to the battery's solder terminals. If the reading is under 2.8V, back up your data immediately, as the battery could fail at any time. You can also test for battery issues by powering off the game and checking if it retains its save.
Clean the Cartridge Contacts
Dust and oxidation on cartridge contacts can interfere with backups. To clean them, use 91% or 99% isopropyl alcohol (IPA) with either a paper-shaft cotton swab or a microfiber cloth. For tougher oxidation, gently rub the contacts with a pencil eraser before wiping them down with IPA.
"The common practice of blowing into games only works because the constant reseating of pulling the game out and replacing it eventually creates a solid connection. The side effect of this is if saliva gets onto the connectors, it can cause corrosion." - ConsoleMods Wiki
Avoid using abrasive materials like sandpaper, Brasso, or Magic Erasers, as these can damage the protective gold plating on the contacts. Always let the cartridge dry completely before inserting it into your console or dumper.
Sort Games by Console Type
Different consoles require specific hardware and adapters for dumping data. For instance, the GBxCart RW is ideal for Game Boy games, while the Retrode works well for SNES and Sega Genesis cartridges. Sorting your collection by console type - such as NES, SNES, Sega Genesis, N64, and GBA - allows you to process games in batches, saving time and minimizing the need to switch equipment or adjust software settings.
To stay organized, consider creating a simple spreadsheet to log each game, its platform, and its physical condition. You can also use this catalog to structure your digital storage folders, such as /ROMs/GameBoy/ or /ROMs/SNES/, for easy access.
Hardware and Software Tools You'll Need
Once your cartridges are ready and sorted, it's time to gather the right tools to extract your game data. The equipment you’ll need will depend on the type of console and media format you’re working with.
Use a ROM Dumper
A ROM dumper allows you to connect your cartridge to a computer and extract its game data. If you’re managing a multi-system collection, the Open Source Cartridge Reader (OSCR) is a solid choice. It works with systems like NES, SNES, N64, Genesis, and Game Boy. Pre-built units cost about $100, while DIY versions are around $50. The OSCR can save data directly to a microSD card, making it a standalone solution.
For handheld cartridges, tools like the GBxCart RW or Joey JR (Gen 4) are great open-source options. If you’re looking for something more versatile, consider the RetroBlaster, which supports at least seven major systems - including NES, SNES, N64, GB/GBA, Genesis, and TurboGrafx-16 - via modular adapters. For example, dumping a 32MB N64 cartridge with the RetroBlaster 2.0 typically takes about 5.5 minutes.
Pay attention to the voltage settings on your dumper: older systems like NES and SNES usually require 5V, while newer ones like N64 and GBA need 3.3V. After dumping, always test the output in an emulator to ensure the data is intact and free of corruption.
Use Disc Imaging Software
For disc-based consoles like PlayStation, Sega CD, or Dreamcast, you’ll need software designed to create exact copies of your discs. Media Preservation Frontend (MPF) simplifies the process by providing a user-friendly interface for advanced tools like Aaru and redumper. Instead of dealing with complex command-line operations, you can select your disc drive, choose your software, and hit “Start Dumping.”
If you’re working with copy-protected discs, tools like CloneCD (for PlayStation discs with LibCrypt) or Alcohol 120% (for DVDs with physical protection) are essential. These programs include built-in verification features to ensure your dumps are accurate.
Manage Saves with Emulators
Emulators such as RetroArch are invaluable for verifying your backups and organizing save data. In RetroArch, you can customize the "Save Files" and "Save States" directories under Settings > Directory. By linking these directories to a cloud-based folder (like Dropbox or Google Drive), your save files can automatically sync across devices.
For more precise testing, use high-accuracy emulators like BGB for Game Boy games or Dolphin for GameCube and Wii titles. If you’re working with GameCube memory card saves, the homebrew tool GCMM (GameCube Memory Manager) can extract individual .GCI save files to an SD card. These files can then be used directly with Dolphin.
Once you’ve gathered all the necessary tools, you’re ready to move on to the Backup Process Checklist and secure your retro gaming collection.
Backup Process Checklist
With your tools in hand, you’re ready to start extracting game data from your cartridges. This involves connecting your dumper, pulling both ROM and save files, and verifying that everything is intact.
Connect Your Dumper and Extract Files
Before inserting your cartridge, make sure to set the correct voltage on your dumper - 3V for N64/GBA and 5V for NES/SNES/GB/GBC/Genesis. This step is crucial to avoid damaging your cartridge. Also, clean the cartridge contacts with isopropyl alcohol and a Q-tip to prevent errors during the dumping process.
"When interfacing with GBA games, make sure to first set the voltage switch on the RetroBlaster to 3V! Otherwise you'll be putting too much voltage into the game, which can damage it if left too long." – RetroBlaster User Guide
For most dumpers, such as the RetroBlaster, insert the cartridge with the label facing the activity LED. For handheld games (GB/GBC/GBA), the label should generally face up. Always connect the dumper directly to your PC’s USB port - avoid using USB hubs, as they can cause performance issues.
Once connected, open your dumper’s software (e.g., RetroBlaster software or FlashGBX), select the appropriate console type, and use the "Dump ROM" or "Dump SRAM" option. Save the file in your designated backup folder with a clear name for easy organization.
For NES games, you might need to manually input the "Mapper Type" and PRG/CHR ROM sizes. Use the NES Cart Database (nescartdb.com) as a reference for these details. After dumping, perform the process twice and verify the files using SHA256 checksums to confirm accuracy. Lastly, load the ROM into an emulator like BGB or RetroArch to ensure it works as intended.
Enable Automatic Save Backups
Once you’ve successfully extracted the ROM, it’s time to secure your save data. Many emulators offer automatic save backup features. For example, in RetroArch, go to Settings > Saving and enable "Auto Save State." You can also adjust the "Auto Save Interval" to control how often snapshots are created.
For GameCube and Wii games, the Dolphin emulator provides built-in save state functionality. You can access it via Emulation > Save State or use hotkeys like Shift + F1 through F8 to save and load multiple save points during gameplay.
Create Custom Cartridges from Your Backups
With verified digital backups, you can create reproduction cartridges for long-term use. Services like BJ's Game Vault (https://bjsgamevault.com) specialize in custom cartridge creation for systems like NES, SNES, Sega Genesis, N64, and GBA. This allows you to play your games on original hardware while protecting your rare or valuable cartridges.
Before writing your ROM to a reproduction cartridge, test it thoroughly in an emulator to confirm it’s working correctly. For N64 saves, tools like ED64-SaveSwap can help ensure compatibility with emulators. This step ensures your reproduction cartridges are reliable and ready for gameplay.
sbb-itb-9a4764e
Using the 3-2-1 Backup Method
The 3-2-1 rule is a straightforward strategy for protecting your retro gaming data: keep three copies of your files, store them on two different types of media, and ensure one copy is off-site. Here’s how you can apply this method to safeguard your retro gaming backups.
For retro gaming enthusiasts, your original physical cartridge serves as the first copy. After extracting the ROM and save data using tools like RetroBlaster or OSCR, create two additional digital backups. Keep one on your computer’s internal drive or an external SSD for easy access. The other should be stored in a geographically separate location, such as a cloud storage service like Google Drive, Dropbox, or Backblaze.
Keep 3 Total Copies of Your Data
Start with the original cartridge as your primary copy. Then, create a digital backup and store it on your computer’s internal drive or a dedicated external SSD. The second digital backup should be placed on an external hard drive that you keep in a different room or area within your home.
This layered approach ensures you’re prepared for various failure scenarios. For example, if the cartridge’s internal battery fails, you’ll still have two digital copies ready to restore your data.
Use 2 Different Storage Types
Once you’ve created three copies, make sure they’re stored on at least two different types of media. Your computer’s internal drive and an external hard drive (HDD or SSD) qualify as two separate storage devices.
Modern external hard drives provide plenty of space for storing extensive ROM collections. External SSDs, on the other hand, are faster and more durable due to their lack of moving parts, making them ideal for frequently accessed save files. HDDs are a cost-effective choice for archiving large ROM sets. However, steer clear of CDs or DVDs - they’re slow, cumbersome, and becoming obsolete.
Store 1 Copy Off-Site
Keeping one copy off-site is crucial for protecting your data from local disasters like fires, flooding, or theft. Cloud storage offers a convenient solution for this. Platforms like Google Drive, Dropbox, or Backblaze automatically sync your files and even maintain version histories, so you can recover older versions of a save file if needed.
"If you're worried about 3rd parties, you can always encrypt data on your computer and then back it up to a 3rd party." – Yev Pusin, Head of Communications, Backblaze
A key point to remember: Syncing services like iCloud or basic Dropbox aren’t the same as true backup solutions. These services often mirror deletions - if you accidentally delete a ROM file on your computer, it may also be deleted from the cloud. To avoid this, use dedicated backup software such as Windows File History or Apple’s Time Machine. These tools automate the backup process and preserve file versions. For added security, encrypt sensitive data, like rare prototype ROMs or personal save files, before uploading them to any cloud service.
How to Store and Organize Your Backups
Keeping your backups organized is a game-changer when you're managing hundreds of ROM files across different console generations. A well-thought-out system ensures you can find what you need without wasting time.
Use Consistent File Names
Start with a standardized naming system. Every ROM file should include the full game title, console abbreviation, and region code. For example, Legend_of_Zelda_Link_to_the_Past_SNES_USA.rom immediately tells you everything you need to know about the file. Use underscores instead of spaces to maintain compatibility across platforms.
"In order to find your files in the future and understand what they contain, you should be consistent and descriptive in naming your files." – University of Northern Colorado
Avoid special characters like &, *, %, #, !, @, or parentheses, as these can cause issues when transferring files between operating systems like Windows, macOS, and Linux. If you’re dealing with multiple versions of the same game or save file, use leading zeros (like v01, v02, v03) so files stay neatly sorted. For dates, stick to the yyyy-mm-dd format (e.g., 2026-01-13) to ensure chronological order.
If your collection is already a mess, don’t panic - bulk renaming tools can help you quickly apply your new naming conventions.
Add Metadata with Organization Tools
Once your file names are consistent, take it a step further by adding metadata. Tools like LaunchBox and RetroArch can organize your ROM collection automatically. These programs pull in extras like cover art, release dates, and even gameplay stats from built-in databases, giving your digital library a polished, user-friendly look.
For more technical details, you can reference specialized databases to enrich your metadata.
"An archive enforces some degree of read-only access – if you want to modify the files, you'll need to extract them first, protecting you from accidentally modifying the savedata." – Chris Barr
Additionally, consider creating a readme.txt file in your main backup directory. Use it to explain your naming conventions, abbreviations, and the tools you used for your backups. This small step can save you (or someone else) a lot of confusion down the road if you need to restore files or share your system with others.
Turn On File Versioning
File versioning is another layer of security for your backups. It keeps multiple snapshots of your files, protecting you from accidental overwrites or corrupted data. If you’re using RetroArch, go to Settings > Saving and enable "Increment Save State Index Automatically." Set "Maximum Auto-Increment Save States to Keep" to 10, which ensures older saves don’t get overwritten. Also, enable "Don't Overwrite SaveRAM on Loading Save State" to safeguard your in-game progress when loading older states.
For broader backup needs, software like Windows File History or Apple's Time Machine can automatically track file versions, making it easy to roll back to earlier copies.
"We'll set up Syncthing to keep version backups in case [an accidental overwrite] happens, but just bear in mind that there is more risk when using a save state vs a save file." – Retro Game Corps
Whenever possible, rely on SRAM (in-game) saves rather than save states. Save states can be more prone to corruption, especially during synchronization. By combining file versioning with reliable in-game saves, you’ll have a backup system that’s both organized and secure.
Restoring Corrupted or Lost Game Data
Losing game progress due to hardware issues can be frustrating, but with the right steps, you can recover your data and get back to playing. Let’s walk through some methods to restore corrupted or lost game saves.
Recover Saves from Emulator Vaults
Before diving into hardware restoration, it’s smart to test your backup files using an emulator. Load your .sav file into a compatible emulator like BGB for Game Boy, mGBA for GBA, or SNES9x for Super Nintendo games.
"Always verify your ROM/save file is working correctly in an emulator like BGB before proceeding with restoring another file or another cartridge." – ConsoleMods Wiki
If the save file loads without issues, you’re good to proceed. If it doesn’t, try loading an older backup version. Ensure that the .sav filename matches the ROM filename exactly - this is crucial for compatibility.
Replace Corrupted Files with Older Versions
When a backup file is corrupted, having a versioning system in place can save the day. Use checksums to identify corruption before attempting restoration. Tools like 7zip can generate CRC checksums during archive creation, allowing you to verify the file’s integrity later.
"A checksum is just a fancy number that describes the contents of a given file. If the file changes in any way, then the checksum will also change – so by generating and storing a checksum of the file now, we can detect if the file gets corrupted later." – Chris Barr
If a file fails the checksum test or won’t load in an emulator, switch to an earlier backup. Keep an eye on file sizes - GBA SRAM saves are typically 32KB, while Flash saves range from 64KB to 128KB. Once you’ve identified a working backup, use ROM dumper software like FlashGBX or Epilogue to restore the save. For devices like the Joey Jr., the process is even simpler: drag the verified .sav file into the "BENNVENN" USB folder to restore it.
Test Restored Data on Reproduction Cartridges
Once you’ve verified and selected the correct save file, it’s time to test it on hardware. To avoid risking your original cartridge, start by testing the restored data on a reproduction cartridge. This step ensures the data is functional without putting valuable hardware at risk. Services like BJ's Game Vault offer reproduction cartridges for consoles such as NES, SNES, Sega Genesis, N64, and GBA, making them ideal for testing purposes.
Before writing data, clean the reproduction cartridge’s gold contacts with isopropyl alcohol to prevent errors. Then, use a ROM dumper like Joey Jr. or GBxCart RW to write the save data. Boot the cartridge on original hardware and check if options like "Continue" or "Load Game" appear, confirming your progress is intact.
If problems arise, ensure the file extension matches the system requirements. Most systems use .sav, but others, like RetroArch, may use .srm. These extensions can often be renamed without conversion. Once you’ve confirmed the save works on the reproduction cartridge, you can safely replicate the process on your original cartridge.
Conclusion: Protecting Your Retro Gaming Collection
Your retro gaming collection isn’t just a stack of old cartridges and discs - it’s a slice of gaming history. But time isn’t kind to these treasures. Cartridges and discs naturally degrade, and internal batteries, like those in Game Boy Advance cartridges, typically only last 15–20 years. That means original titles from the early 2000s are now at risk of losing their saved data forever.
This is where having a solid backup plan becomes essential. From cleaning contacts to adopting the 3-2-1 backup approach, the strategies discussed here provide a clear path to preserving your collection for years to come. Digital preservation is no longer just an option - it’s a necessity. Regularly backing up your games protects against the inevitable: physical wear, battery failure, and even hardware becoming obsolete.
"Once a cartridge or disc becomes unreadable, the game is lost unless it has been backed up digitally." – GameBoyShells
And here’s a wake-up call: only 11% of computer users back up their data daily. Don’t let your collection become part of that statistic. Take action now. Clean those contacts, dump your ROMs and save files, test them in an emulator, and distribute copies across multiple locations. These simple steps ensure your gaming legacy remains intact for future generations.
FAQs
How can I tell if the battery in my game cartridge is failing?
To determine if your game cartridge's battery is running low, grab a multimeter and set it to voltage mode. Gently measure the battery's voltage. If the reading is well below the standard level (usually around 1.5V), it’s a clear sign that the battery might need replacing. Low voltage can cause problems like losing save data, so it’s a good idea to take care of it sooner rather than later.
How should I clean cartridge contacts before backing up retro game data?
When it comes to cleaning cartridge contacts before backing up your retro game data, careful handling is key to avoiding damage. Begin by setting up a clean, static-free workspace to work safely. Use a small screwdriver to open the cartridge and check the gold pins for any dirt or corrosion. If the pins appear in good shape, gently rub them with a clean eraser to get rid of surface grime. Next, take a cotton swab, dampen it slightly with 99% isopropyl alcohol, and carefully clean each contact to remove any lingering residue.
Be sure the contacts are completely dry before putting the cartridge back together. Steer clear of metal polish, water-based cleaners, or blowing into the cartridge, as these methods can lead to damage or leave unwanted residue. Once reassembled, test the cartridge on your console or backup device to confirm everything is working properly. These steps can help safeguard your retro game data and keep it safe from loss or corruption.
What is the 3-2-1 backup method, and why is it ideal for preserving retro game data?
The 3-2-1 backup method is a trusted strategy for protecting your retro game data, including ROMs and save files, from potential loss or damage. Here’s how it works: you keep three copies of your data, store them on two different types of media (like an external hard drive and a cloud service), and make sure one copy is off-site in a secure location.
This approach helps shield your collection from threats like cartridge wear, hardware malfunctions, accidental deletions, or even malware attacks. By spreading your backups across different storage options and locations, you can preserve your retro gaming treasures for the long haul.