


Custom Music for GBA Games: Tips
Adding custom music to GBA games requires working within the system's hardware constraints while using specialized tools and techniques. The GBA's audio system combines 4 PSG channels and 2 PCM channels, allowing for rich soundtracks despite limitations like an 8-bit sample depth and CPU-dependent audio mixing. Key steps include optimizing MIDI files, managing track limits, and testing playback to ensure compatibility with the GBA's sound engine.
Key Takeaways:
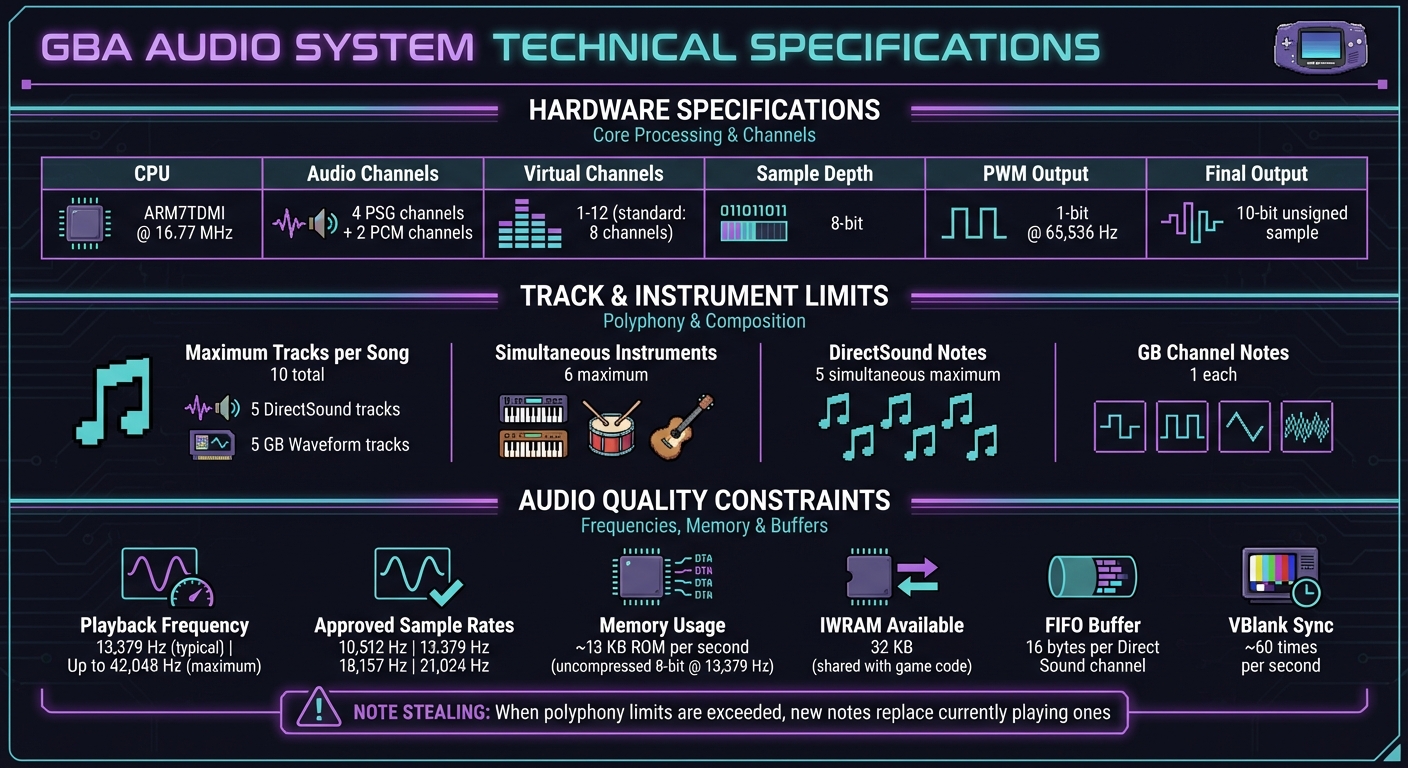
- Hardware Constraints: The GBA supports up to 10 tracks per song (5 DirectSound, 5 GB Waveform) with a maximum of 6 instruments at once.
- File Preparation: Limit MIDI tracks, define loop points, and adjust instruments to fit GBA specs.
- Tools to Use: Programs like Sappy, Mid2AGB, and Anvil Studio simplify music conversion and insertion.
- Testing: Use emulators and tools like Sappy for playback testing, ensuring audio sync and proper instrument mapping.
By carefully preparing MIDI files, using the right tools, and adhering to system limitations, you can successfully integrate custom music into your GBA projects.
How I put my music into Pokémon Fire Red
sbb-itb-9a4764e
GBA Audio System Constraints
GBA Audio System Technical Specifications and Constraints
How the GBA Sound System Works
The Game Boy Advance (GBA) audio system is entirely dependent on its ARM7TDMI CPU, which runs at approximately 16.77 MHz. This processor handles every aspect of audio processing, including mixing, adjusting volumes, and adding effects like reverb. All of this happens alongside the CPU's other responsibilities, such as managing game logic and rendering graphics.
Most GBA games use the m4a sound engine (also called MusicPlayer2000 or Sappy) to convert MIDI-like data into audio streams. This engine mixes between 1 and 12 virtual audio channels into the GBA's two hardware PCM outputs, with 8 channels being the standard setup. The typical playback frequency is 13,379 Hz, though it can handle up to 42,048 Hz. However, when too many channels are active, the engine employs "note stealing", replacing currently playing notes with new ones.
Once the audio is mixed, it is output via 1-bit Pulse Width Modulation (PWM) at 65,536 Hz with an 8-bit resolution. The GBA hardware uses nearest-neighbor resampling to match audio sample rates to the PWM frequency. Unfortunately, this process introduces aliasing, which is why many GBA games have a metallic or scratchy audio quality.
These technical aspects highlight the limitations inherent in the GBA's audio system, influencing how music and sound effects are created for the platform.
Main Limitations to Know
The way the GBA handles audio imposes several constraints that developers must navigate when creating custom soundtracks or effects.
First, the GBA's 8-bit sample depth is a clear step down from the 16-bit quality of CD audio, leading to quantization noise, such as hissing or static. While the hardware produces a final 10-bit unsigned sample for playback, the original audio remains limited to 8-bit resolution.
Memory and CPU resources are also tight. One second of uncompressed 8-bit audio at 13,379 Hz requires around 13 KB of ROM space. Meanwhile, the fast Internal Working RAM (IWRAM) offers only 32 KB, which must be shared with essential game code. Each Direct Sound channel uses a 16-byte FIFO buffer that requires constant refilling via DMA to avoid audio dropouts. Timing is another critical factor - audio buffers must sync with the GBA's VBlank interval, which occurs roughly 60 times per second, to prevent clicks or pops in the sound. Misaligned sample rates can cause additional artifacts, so developers stick to approved frequencies like 10,512 Hz, 13,379 Hz, 18,157 Hz, or 21,024 Hz.
These limitations demand careful planning and optimization to achieve the best possible audio performance on the GBA.
Getting Your Music Ready for Conversion
Once you've dealt with the hardware constraints, the next step is preparing your MIDI file for conversion to GBA format. This process requires careful attention to detail to ensure smooth playback and avoid errors.
MIDI File Preparation Checklist
Before starting the conversion, you'll need to address a few technical requirements to make sure your MIDI file is compatible with the GBA's limitations:
- Rename your file: Avoid spaces or special characters in the filename. For example, change "Battle Theme.mid" to "Battle_Theme.mid." Tools like mid2agb won't process files with spaces.
- Limit your tracks: Stick to a maximum of 10 tracks - 5 for DirectSound and 5 for GB Waveform. For battle music, reserve one DirectSound track specifically for attack sound effects.
-
Set loop points: Use
[and]brackets to define loops. Reinsert all MIDI events (like volume, panning, and program changes) at the start of the loop. Without this step, the GBA might carry over settings from the end of the loop, which could lead to unexpected playback issues, such as mismatched instruments. - Mind the note limits: The GBA can handle up to five simultaneous DirectSound notes, plus one note each for Square 1, Square 2, Triangle, and Noise channels. If you exceed these limits, "note stealing" will occur, where new notes replace currently playing ones.
Once your MIDI file meets these requirements, you can move on to refining your instrument mapping.
Mapping and Optimizing Instruments
Because the GBA has specific audio limitations, mapping your instruments correctly is critical to maintaining the integrity of your music.
- Adjust instrument numbers: Add 1 to each Sappy/GBA instrument number in your MIDI editor. For example, if the original instrument is Trumpet (56), change it to 57. Be sure to verify all mappings before conversion.
- Scale volume logarithmically: The GBA and MIDI both use a 0–127 volume range, but they interpret it differently. To maintain balance, apply logarithmic scaling. As audio expert ipatix explains:
"In audio acoustics, double the amplitude is defined by a signal amplification of 6 dB... double the loudness the human ear perceives is an amplification by 10 dB... simplified, this results in amplitude = x ^ (10 / 6)."
Without this adjustment, your music may sound unbalanced.
- Handle program changes carefully: Ensure program changes within a track have at least four blank notes before they take effect. Also, since some GBA sound engines ignore "Expression" controller events, merge them into the main "Volume" events for consistency.
- Select the right voicegroup: The voicegroup (or soundbank) in the ROM plays a huge role in the final quality of your music. Choose one that includes the instruments used in your MIDI file. For instance, if your MIDI uses a trumpet but the voicegroup lacks a trumpet sample, the GBA will substitute a 50% Square Wave 1 sound, which can drastically alter your music’s tone.
For additional support, tools like midfix4agb can simplify some of these steps. This software can help fix loop resets, scale volumes, and even insert LFO speed events for more realistic modulation. By taking the time to map and optimize your instruments, you'll be one step closer to a polished and playable GBA track.
Software Tools for Music Insertion
Required Software Programs
Once your MIDI file is optimized, the next step is to use the right tools to incorporate your music into the GBA ROM. This process requires a combination of tools, each serving a specific purpose in converting and inserting the music.
Sappy 2006 Mod 15 is a popular choice for managing .s files. It allows you to play, assemble, and insert these files directly into your ROM, making it an essential part of the workflow.
Mid2AGB (also known as MIDI2GBA) converts standard MIDI files into .s assembly files that are compatible with the GBA sound engine. To address common issues like volume inconsistencies or looping problems, Midfix4agb can be used as a supplementary tool.
You'll also need Free Space Finder to locate at least 3,000 free bytes in your ROM for the music data. Anvil Studio is particularly handy for optimizing your MIDI tracks and remapping instruments to IDs compatible with the GBA sound engine before starting the conversion process. For applying .ips patches, Lunar IPS is the go-to tool. If you prefer an all-in-one solution, FEBuilderGBA offers built-in features for music insertion and management, along with other ROM editing capabilities.
These tools work together to simplify the music insertion process, ensuring that your earlier MIDI preparations transition smoothly into the ROM.
Using Patches for Compatibility
In addition to conversion tools, compatibility patches play a key role in refining instrument mapping and improving audio quality. One example is the Native Instrument Map patch (sometimes called the "All Instruments Patch" by Alisa180), which provides a complete voicegroup. This patch lets you insert MIDI files that use standard instrument mappings without needing manual adjustments, preserving the intended sound of your instruments.
To apply these patches, use Lunar IPS to patch your ROM with the desired .ips file before inserting your music. For better audio mixing, the gba-hq-mixer patch is a great option when working with the standard m4a/mp2k (Sappy) sound driver. If you're aiming for a specific sound style, you might explore patches like Squeetz, HGSS (HeartGold/SoulSilver), or BW (Black/White) to replace the default soundbank.
One important tip: make sure the MPlayDef.s file is in the same directory as your .s file. Sappy relies on this file to assemble and import your music successfully. Without it, you could run into assembly errors that are often difficult to troubleshoot.
How to Insert Custom Music Step-by-Step
Adding MIDI Files to the ROM
Once your MIDI file is ready, the next step is converting it into a format the GBA can use. To do this, run mid2agb.exe with your .mid file. This creates an .s file, which is your assembly-ready format. Next, open Free Space Finder to locate 1,000 to 3,000 bytes of free space in the ROM. Make sure to note the hex offset (e.g., 0x800000).
Now, open your ROM in Sappy and find the song slot you want to replace. Follow these steps:
- Navigate to Tasks → Assemble Song and select your
.sfile. - Input the Free Space Finder offset into the Base Destination Offset field.
- Enter the instrument set location into the Voicegroup Offset field (e.g.,
0xB30C5Cif you're using an "All Instruments" patch). - Click Cook it and confirm the update to the Song Table.
Once the song data is inserted, you can tweak individual track parameters to ensure everything plays smoothly.
Adjusting Track Settings
After mapping your instruments correctly, it's time to fine-tune the track settings for seamless playback. The GBA's DirectSound system supports up to five simultaneous notes. If your song exceeds this limit, some notes may be dropped during playback.
Use Sappy's Edit voice table tool to adjust instrument samples or tweak the ADSR (Attack, Decay, Sustain, Release) settings if any instruments sound out of place. For volume adjustments, stick to linear values between 0 and 127. Tools like Midfix4agb can automatically scale the volume for better results.
For panning and stereo effects, use a value of 0 for center positioning, or experiment with effect codes depending on your sound engine. Set reverb to 50 for a balanced effect, and configure priority levels (0 to 5) to manage which sounds get cut first when the polyphony limit is reached.
Testing and Improving Your Custom Music
Testing with Sappy and In-Game Features
Once your song is assembled, use Sappy's Play button (the green arrow) to test its playback. You can use the location checkboxes to isolate specific tracks, making it easier to verify that each instrument is correctly mapped.
Next, load your modified ROM into an emulator like VisualBoyAdvance. Navigate to the point in the game where the song should play, such as the Title Screen, a specific map, or a battle encounter. This step ensures your custom track works properly in the game. If the song doesn’t trigger, you might need to extract the music from a working ROM and re-import it into your project.
For quicker testing, you can temporarily replace the Title Screen theme with your custom track. This avoids the hassle of navigating through multiple layers of gameplay just to hear your song.
If playback issues arise during testing, refer to the troubleshooting tips below.
Fixing Common Audio Problems
Once playback has been tested in Sappy and through an emulator, you can focus on resolving any issues. Start by isolating problematic tracks in Sappy or Anvil Studio. This helps identify which track might be causing errors like clipping, distortion, or incorrect instrument playback.
If an instrument sounds overly simplistic - like a "monophonic ringtone" or a basic synth - check the assigned Voicegroup. If the required instrument isn’t included in the Voicegroup, the GBA will default to its internal GB Waveform. You can fix this by either changing the Voicegroup offset to one that includes the instrument or applying the "All Instruments Patch", which adds a Windows-style MIDI soundfont to your ROM.
Here’s a quick reference table for common audio issues and their fixes:
| Common Audio Problem | Likely Cause | Recommended Solution |
|---|---|---|
| Lag/Slowdown | Too many DirectSound tracks | Limit to 5 DirectSound tracks; use GB Synth for additional tracks |
| Incorrect Instrument | Voicegroup mismatch | Adjust the Voicegroup offset or apply the "All Instruments Patch" |
| Clipping/Distortion | MIDI volume too high | Lower track volumes in Anvil Studio before assembling |
| Drums Dropping | SFX interference | Reserve one DirectSound track exclusively for game sound effects |
| Instrument sounds "thin" | Notes out of range | Ensure notes remain within the instrument's defined frequency range |
"Balancing the volume of your midi tracks can really help your midi sound better on the actual GBA." – Magnius, Pokémon Music Hacking Guru
For battle music, keep the number of DirectSound tracks to 4 instead of 5. This ensures one track is reserved for attack sound effects. Magnius highlights this in his advice:
"Maximizing 5 D/S tracks may sacrifice the drums upon execution of attacks like Surf, or when there's a stat change (+ATK, -DEF)."
If Sappy crashes when you press play, consider reducing the number of instruments in your MIDI or shortening the filename of the .s file. Additionally, when inserting custom WAV samples as instruments, set the ADSR values in Sappy's "Edit Voice Table" to 255, 0, 255, 0 to maintain audio clarity.
Guidelines for Custom Music Projects
Giving Credit and Attribution
When working on custom music projects, it's important to credit the MIDI transcriber in addition to the original game composer. This acknowledgment respects the effort that goes into transcription. The community strongly opposes "uncredited transcription reuse", which involves taking someone else's MIDI transcription, applying a soundfont, and presenting it as your own work.
"You generally cannot make money from your edited video game music. Do not sell it, do not ask for donations, and to be honest, you shouldn't even run ads against it." – SiIvaGunner Official Ripping Guide
If you're creating an arrangement rather than a direct port, ensure your version introduces meaningful creative changes. Simply swapping out instruments in a note-for-note copy doesn’t make it original. Copyright laws focus on "recognizability" - if listeners can identify the source material, it’s still considered copyrighted content.
Once you've addressed attribution and originality, it's time to focus on keeping your project files organized.
Managing Your Project Files
To stay efficient, organize your project files thoughtfully. Start by creating a main directory with subfolders, such as 'source' for code and 'data' for music binaries. For decompilation projects like Pokeemerald, store MIDI files in sound/songs/midi and instrument definitions in sound/voicegroups.
Keep both the original MIDI files and their converted versions (e.g., .bin, .s, .xm) so you can make adjustments later if needed. Be cautious with commands like make clean, as they can delete generated .s files in certain setups. To avoid losing custom .s files, either modify your Makefile to protect them or back them up separately.
When distributing your music as part of a ROM hack, use the BPS (Binary Patching System) format instead of the older IPS patches. BPS patches include checksums that ensure the patch is applied to the correct ROM version, reducing the risk of corrupted files. This approach improves reliability and aligns with best practices. Before releasing your patches, test them with tools like RomPatcher.js on various devices to ensure compatibility.
Conclusion
Creating custom music for GBA games demands a close focus on the system's hardware limitations, along with thorough preparation and testing. The GBA's sound system supports up to 10 tracks per song, but DirectSound is limited to just 5 simultaneous notes, making precision a must at every stage of the process.
Once your preparation is complete, the conversion process is relatively simple. Use mid2agb to convert your MIDI files into assembly (.s) format, and then insert them into your ROM using Sappy. Before converting, double-check that your MIDI files are properly sequenced and that the instrument IDs align with the GBA instrument table.
After adding your music, rigorous testing becomes critical. Tools like Sappy or SoundMon.elf can help you identify issues early on. For battle music, limit yourself to 4 DirectSound tracks to leave the 5th available for attack sound effects. This ensures that essential percussion won't be drowned out during combat.
Achieving high-quality results means balancing creativity with technical accuracy. Experiment with voicegroups, fine-tune track volumes before insertion, and always test your music on hardware or highly accurate emulators to ensure it performs as intended.
FAQs
How do I pick the right voicegroup?
To pick the best voicegroup for your GBA game music, think about the instruments and overall sound you’re aiming for. Each voicegroup comes with its own set of instruments and tonal characteristics, so your choice should align with the mood and style you want to create. For instance, if you’re going for a melodic feel, orchestral voicegroups might be a great fit. Don’t hesitate to try out different options and listen to how they work within your project - this hands-on approach can help you find the perfect match.
Why do my notes keep disappearing?
When working with GBA music, your notes might vanish due to problems with how the music data is stored or modified. GBA music typically comes in two formats: sequenced or streamed. Of the two, streamed music is much trickier to edit. Using the wrong tools or extraction methods can also lead to failed edits or data loss.
To avoid these issues, make sure you're using the right format for your edits, such as MIDI files or soundfonts, and stick to trusted tools designed specifically for this purpose. Proper preparation and the right resources can save you from unnecessary headaches.
What sample rate sounds best on GBA?
The ideal sample rate for GBA sound falls between 5734 Hz and 42048 Hz, with 13379 Hz often used as a default. These rates are crucial for maintaining smooth playback and avoiding clicks when switching audio buffers.