


N64 HDMI Adapter Firmware Update Tutorial
Updating your N64 HDMI adapter firmware is key to improving your console's performance and ensuring compatibility with modern hardware. This guide covers the essentials, including tools, steps, and troubleshooting tips for various adapters like UltraHDMI, N64Digital, and Retro GEM.
Key Takeaways:
- Better visuals: Updates can add features like progressive scan output and higher resolutions (e.g., 1600x1200 with 5x scaling).
- Reduced input lag: Features like "zero lag" mode improve responsiveness by bypassing the framebuffer.
- Fixes and compatibility: Updates resolve issues like audio clipping, reset loops, and compatibility with flash carts like Everdrive.
Tools Needed:
-
UltraHDMI: Requires a flash cartridge (e.g., Everdrive 64) to load
.z64firmware files. - N64Digital/Retro GEM: Updates via WiFi using the adapter's built-in WebUI.
-
N64 Advanced: Needs an Altera USB Blaster and Quartus Prime Programmer for
.poffiles.
Quick Steps:
- Identify your adapter model: Check firmware and hardware version to download the correct update.
- Download the firmware: Use official sources to avoid corrupted files.
- Set up a safe workspace: Ensure proper tools and precautions to avoid damage.
- Follow the update process: Each adapter has specific steps, from using flash cartridges to WiFi-based updates.
Troubleshooting Tips:
- Verify HDMI output and firmware version via the On-Screen Display (OSD).
- Use Rescue Mode for failed updates (e.g., N64Digital).
- Address common issues like resolution mismatches or reset loops with the latest firmware.
Regular updates ensure smoother gameplay, sharper visuals, and better compatibility with modern setups. Follow this guide to keep your N64 HDMI adapter running optimally.
Getting the N64 ready for 2004 (64HD install and firmware update)
sbb-itb-9a4764e
Required Tools and Materials
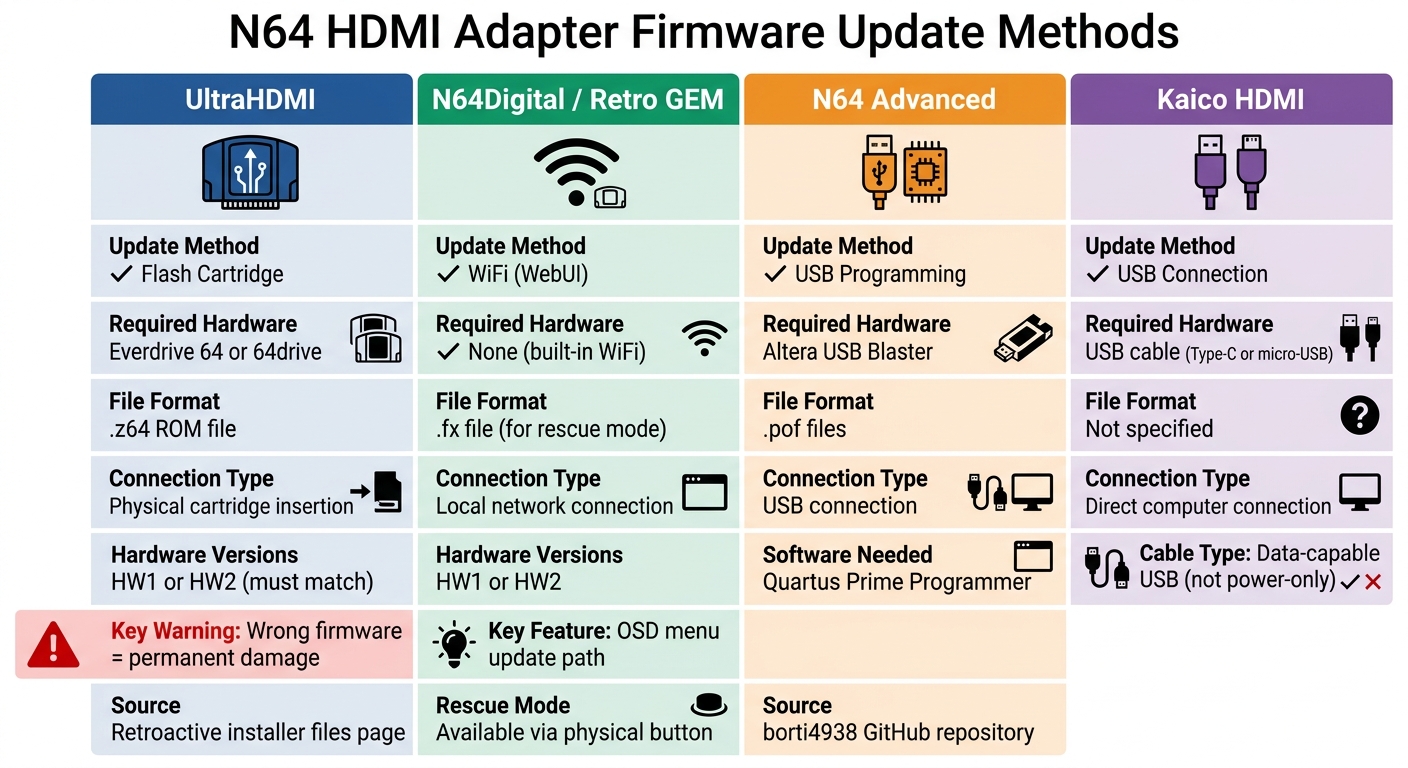
N64 HDMI Adapter Firmware Update Methods Comparison Chart
Basic Hardware and Software
The tools you need depend on the adapter model you're working with. For UltraHDMI updates, you'll require a flash cartridge like an Everdrive 64 or 64drive to run the firmware file, which is provided as a .z64 ROM file. Be sure to download the correct version, either HW1 or HW2, from the official Retroactive installer files page. Using the wrong firmware file will permanently damage your adapter.
For N64Digital and Retro GEM adapters, updates are handled differently. These units use WiFi and their built-in WebUI, so all you need is a stable local network connection - no flash cartridge required. On the other hand, N64 Advanced adapters need an Altera USB Blaster and Quartus Prime Programmer software to flash .pof files. These files are available on the borti4938 GitHub repository.
Regardless of the adapter, you'll need the following basics: your N64 console, the HDMI adapter, a mini-HDMI to HDMI cable, a controller, and either a Jumper Pak or Expansion Pak. Make sure to use a data-capable USB cable; standard power-only cables won't work.
If you encounter issues during the update process, you may need to turn to advanced tools for troubleshooting.
Advanced Tools for Complex Updates
When an update fails or during the initial setup, you might need hardware-level tools. A temperature-controlled soldering iron with leaded solder and non-corrosive no-clean flux (like Kester 959T or Amtech 559) is essential for tasks such as repairing connections or enabling In-Game Reset functionality.
A multimeter is invaluable for checking for shorts between the 3.3V rail and ground before powering on the adapter. This step can help you avoid damaging the hardware. You'll also need 99% Isopropyl Alcohol to clean flux residue and keep FFC connectors free of debris. To prevent shorts, use Kapton tape or electrical tape to insulate components, especially against the metal RF shielding.
For case modifications, have a 4.5mm Gamebit adapter, Phillips screwdrivers (P1/P2), and tools like an Exacto knife or a miniature file set on hand. These will help you make precise adjustments to fit the adapter properly within the console casing.
Preparing Your Adapter and Console
Checking Your Adapter Model
Start by identifying your adapter model. For Electro Modder adapters, the firmware version appears on the bottom of the built-in OLED screen when you power on the console. If you have a V2 series, look at the USB port on the right side - V2.1 uses USB Type-C, while V2.0 relies on micro-USB.
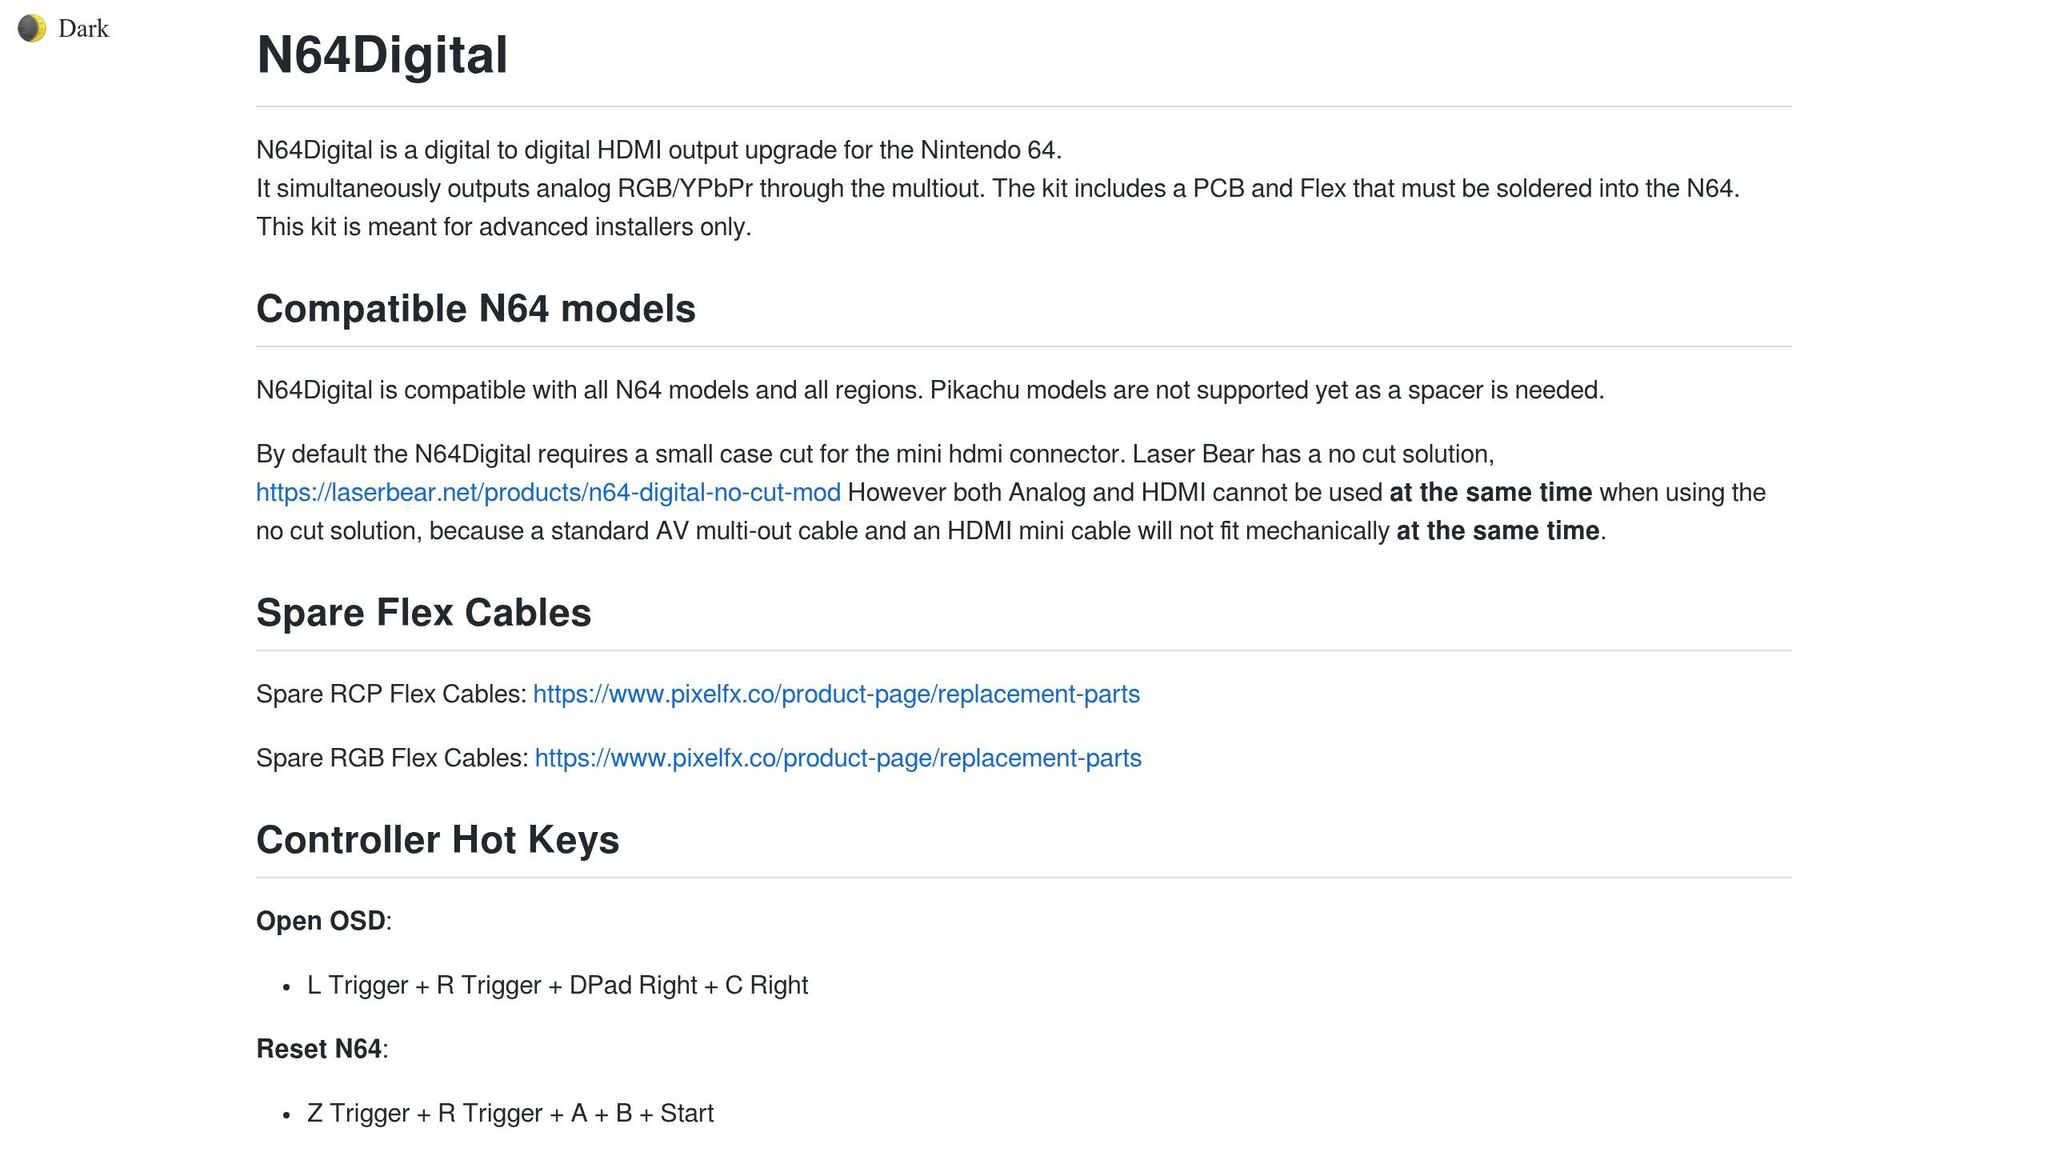
If you're using a N64Digital adapter, the hardware revision is key. Open the OSD menu by pressing L Trigger, R Trigger, DPad Right, and C Right simultaneously to check the firmware version. If physical inspection is necessary, HW1 uses a foam block for the multiout connection and discrete wires for the PIF installation. In contrast, HW2 features a 3D-printed plastic block, a PIF flex cable, and a clock jumper on the main board.
For UltraHDMI adapters, distinguishing between HW1 and HW2 is crucial since the wrong firmware can permanently damage your unit. You can verify the firmware version through the OSD menu before downloading any updates.
Once you've identified your adapter model, you're ready to download the correct firmware.
Getting the Right Firmware Files
After confirming your adapter model, download the appropriate firmware files. Always use official sources to avoid corrupted files that could harm your hardware. For UltraHDMI, download the .z64 file from the Retroactive official installer page: http://ultrahdmi.retroactive.be/installer_files/. If you're using version 1.09, upgrade to version 1.10 immediately to fix a bug that causes games to freeze during the In-Game Reset function.
For N64Digital adapters, updates are completed via WiFi through the OSD menu. Connect to your network by navigating to OSD → System → WiFi, then check for updates under OSD → System → Firmware. If WiFi isn't an option, you can manually flash the firmware using the official PixelFX Rescue System web interface. Note that the HW2 launch firmware (version 2.1.34) has known issues with image glitches over HDMI and RGB, so updating right away is a must.
For further details on UltraHDMI firmware changes, you can review the full changelog here: http://ultrahdmi.retroactive.be/installer_files/rn_fw.pdf.
Once you've downloaded the correct firmware, it's time to set up a safe workspace for the update.
Creating a Safe Workspace
Prepare your workspace with retro console cleaning kits and the tools you'll need, including a 4.5mm Gamebit and P1/P2 screwdrivers. Before powering on, use a multimeter to check for shorts between the 3.3V rail and ground.
Clean the FFC connectors with 99% Isopropyl Alcohol before attaching any cables. To prevent accidental shorts during testing, apply Kapton tape or electrical tape to the top shield. If you're testing with a disassembled console, limit power-on time to 30 seconds without the heatsink to avoid overheating.
During the 6-minute firmware flash, ensure your setup is stable. Avoid turning off the power, resetting the console, or handling the cartridge. Also, make sure your TV or monitor won’t auto-sleep - some users have bricked their units when the display shut off during the "validating data" phase. A little extra caution here can save you a lot of trouble!
Firmware Update Instructions
Updating Kaico HDMI Adapters
To update Kaico HDMI adapters, you'll need to use a USB connection. Connect your adapter to your computer using the appropriate cable - Type-C for newer models or micro-USB for older ones. Once connected, refer to the official update documentation and follow the on-screen prompts. Make sure the adapter remains connected until the update process is fully completed.
Updating N64Digital or 64HD Adapters
The N64Digital adapter allows firmware updates via WiFi. Start by connecting the adapter to your home network. Then navigate to OSD → System → Firmware to check for available updates. If an update fails, such as during a power outage, you can use Rescue Mode to recover. Here's how:
- Remove the top case of the adapter.
- Hold the physical button while powering on the console.
- Connect to the "Rescue-System" WiFi access point using the password "Rescue-System".
- Open a web browser and go to http://192.168.4.1. Upload the
n64digital-update.fxfile and allow up to 5 minutes for the firmware to flash.
Keep the console powered on throughout this process to avoid firmware corruption.
Some firmware versions may require a bootloader update after the initial installation. Once the initial update is complete and the system restarts, go back to "Update Firmware" to install the bootloader update. Afterward, you can verify everything is working by running a self-test via OSD → Debug → Self Test.
Updating UltraHDMI Adapters
Updating UltraHDMI adapters involves using a flash cartridge, such as a 64drive or Everdrive 64. First, download the correct .z64 firmware file for your adapter's hardware revision from the official Retroactive installer page. Copy this file to your flash cartridge, insert the cartridge into your Nintendo 64, and power on the console. The screen will display instructions for completing the UltraHDMI update. Follow these on-screen steps to finish the process.
Testing and Fixing Problems
Checking HDMI Output and Firmware Version
After updating your adapter, it's essential to confirm that the new firmware is running smoothly. To do this, open the On-Screen Display (OSD) using your controller. For UltraHDMI adapters, use the combination L/Z + Dpad Right + C Right + R Trigger on Controller 1. For N64Digital adapters, press L Trigger + R Trigger + DPad Right + C Right. If the OSD doesn't appear, double-check your console's power and cable connections as described in the setup instructions.
Once the OSD is accessible, go to the About or System section to verify the firmware version. While you're there, run the built-in Self-Test to ensure the hardware is functioning correctly. If the OSD doesn't respond during gameplay - possibly due to certain games not polling the controller during loading screens - try turning on your N64 without a game cartridge inserted. This forces the OSD to load on its own.
Another way to confirm the update is by looking for newly added features. For instance, UltraHDMI v1.09 introduced the Zero Lag mode, which should now appear in your settings if the update was successful. Similarly, N64Digital HW2 users should notice that any image flickering or artifacts from the launch firmware are resolved after updating. If you encounter any issues during these checks, move on to the troubleshooting steps below.
Fixing Common Issues
If your composite output works but HDMI doesn't, start by inspecting your HDMI cable and mini-HDMI adapter. Additionally, try adjusting the output resolution. If 1080p fails, switch to 480p or 720p .
For N64Digital users who experience a failed update due to power loss, you can recover by entering Rescue Mode. Follow the rescue instructions provided earlier and re-upload the firmware file.
If you're using UltraHDMI v1.09 and encounter reset loops, update to v1.10 immediately to fix the in-game reset issue. You can also use the Self-Test feature via OSD → Debug → Self Test to diagnose hardware problems. Here's how to interpret the results:
| Self-Test Result | Meaning | Potential Cause |
|---|---|---|
| ❤️ | Good Signal | Everything is functioning as expected |
| X | Adjacent Bridge | Signals are matching adjacent pins; check for solder bridges |
| L | Low Signal | Indicates a bridge to ground |
| H | High Signal | Indicates a bridge to 3.3V |
These steps should help you identify and resolve any issues, ensuring your adapter and console work seamlessly.
Conclusion
Updating your firmware is a smart way to boost performance and maintain reliability for your retro gaming system. For example, updating the firmware on your N64 HDMI adapter helps you get the most out of it, ensuring smoother gameplay and better compatibility with modern hardware. These updates not only fix bugs but also address issues like handshake problems with 4K displays, HDMI CEC/eARC, and compatibility with flash carts like the Everdrive. Plus, they often introduce features that improve image quality on today’s displays.
If you’re using an N64Digital HW2, installing the latest firmware can quickly fix issues like glitchy images over HDMI and RGB output. Meanwhile, adapters like the Retro Gem make it even easier with Wi-Fi-enabled updates, so you don’t need ROM carts or extra cables to stay current. Keeping your firmware updated ensures your system delivers the best gameplay experience and works seamlessly with modern displays.
FAQs
How do I confirm my adapter’s hardware revision before updating?
To figure out the hardware revision of your N64 HDMI adapter, look for specific physical features. For instance, the HW2 main board typically includes a clock jumper, as outlined in the manufacturer's documentation. Firmware updates vary depending on whether your adapter is HW1 or HW2, with HW2 having some known issues that may need fixing. To avoid problems, either visually inspect your adapter or consult the manufacturer’s instructions to confirm the correct firmware update for your device.
What should I do if the firmware update fails and I get no HDMI signal?
If your N64 HDMI adapter firmware update fails and you lose the HDMI signal, here’s what you can do:
- Retry the update: Double-check that you’re using the correct update file and that it’s been transferred properly. Then, attempt the update again.
- Verify compatibility: Make sure the update process matches your specific adapter model and firmware version.
- Reset and power cycle: Unplug the adapter, turn off your console, then reconnect everything and try again.
If the problem continues, reach out to the manufacturer or seek advice from expert communities.
Will updating firmware improve lag and video quality on my TV?
Updating the firmware on your N64 HDMI adapter can improve video quality and minimize lag. For example, the latest UltraHDMI firmware introduces a 'zero lag' feature, allowing near-instant HDMI signal synchronization on compatible TVs. These updates can also address bugs - like the reset issue fixed in a recent version - leading to better performance and enhanced video output.