


Ultimate Guide to ROM Disassembly Techniques
ROM disassembly is the process of converting a game's binary data back into assembly language. This allows you to understand, modify, and preserve classic games by analyzing their original programming. Here's what you need to know:
-
What It Is: It translates hexadecimal code into human-readable assembly mnemonics (e.g.,
A9 00becomesLDA #$00). - Why It Matters: Disassembling helps understand game mechanics, fix bugs, translate text, or even add new features. It's also a way to preserve retro gaming history.
- What You Need: Tools like hex editors (e.g., HxD), disassemblers (e.g., Ghidra, IDA Pro), and debugging emulators (e.g., FCEUX, Mesen-S) are essential. Knowledge of hexadecimal and the assembly language for your target console is critical.
- Challenges: Distinguishing code from data (e.g., graphics or text) is tricky. Misinterpretation can lead to errors in the output.
Disassembly is a step-by-step process requiring patience. Start small, use debugging tools to analyze code in real-time, and label variables for clarity. For consoles like NES, SNES, and Sega Genesis, understanding their unique processors (e.g., 6502, 65816, 68000) is key. This guide equips you with the basics to dive into ROM disassembly and explore the logic behind your favorite retro games.
Below-C-Level October 2023: Austin Clements - Reversing SEGA ROMs using Ghidra

Tools for ROM Disassembly
When diving into ROM disassembly, having the right tools in your arsenal is crucial. Hex editors, disassemblers, and debugging emulators each play a distinct role in the process. By understanding how these tools work and what they’re best suited for, you can streamline your workflow and tackle even complex ROMs with confidence.
Hex Editors and Their Role
Hex editors allow you to view and modify the raw binary data within ROM files. For general editing, HxD is a standout choice, offering precision and ease of use for examining file structures at specific offsets. When working with retro games, you’ll often need hex editors that support Table Files (.tbl), which map custom character encodings. Tools like WindHex and Crystal Tile 2 excel in this area, making in-game text editable. Hex editors are particularly handy for quick "hex tweaks", such as changing a single byte to adjust damage values or item quantities - no deep understanding of the codebase required.
Disassemblers and Debuggers
Disassemblers translate binary machine code into readable assembly language, providing insights into the game’s logic and structure. Ghidra, a free and powerful option, is a favorite for its flexibility, though it requires console-specific plugins for unique architectures. For NES ROMs, you can install the Ghidra-Nes-Rom-Decompiler-Plugin via File -> Install Extensions. Keep in mind that this plugin supports specific mappers (e.g., Mapper 0, 1, 2, 7, 10, and 19), so obscure or unofficial mappers might not work correctly.
For those seeking a professional-grade tool, IDA Pro is the gold standard. While it often requires custom IDC scripts to handle ROM-specific configurations, it offers unparalleled precision. Both Ghidra and IDA Pro allow manual corrections to disassembly errors using commands like D (force disassembly), C (clear incorrect code), and L (rename labels). Leveraging community documentation can make label renaming and other adjustments more efficient.
Emulators with Debugging Features
Debugging emulators provide real-time analysis, making them invaluable for ROM disassembly. FCEUX is a go-to choice for NES debugging, equipped with a Code/Data Logger (CDL) that tracks which parts of the ROM are executed as code versus treated as data. This generates a mask file that can be imported into disassemblers like IDA Pro, resulting in cleaner and more accurate outputs.
"The Code/Data Logger becomes the most useful when you need to restore a full source code of a game... Making full and working/reassemblable disassembly becomes really easy this way." - FCEUX Documentation
For SNES ROMs, Mesen-S stands out with features like a real-time assembler for on-the-fly code edits and a performance profiler to pinpoint bottlenecks. Tools like NO$SNS and NO$GBA are also highly regarded for their detailed hardware register information and real-time VRAM viewers. By setting write breakpoints on specific memory addresses, you can pause execution whenever values change, helping you identify the exact instructions controlling game variables like health or lives.
Armed with these tools, you’re ready to dive into the step-by-step process of ROM disassembly, which we’ll cover next.
How to Disassemble ROMs Step by Step
Disassembling a ROM involves converting its raw data into structured assembly code. With the right tools and methods, you can break down a ROM by examining its structure, loading it into a disassembler, and analyzing the instructions it generates.
Examining ROM Files in a Hex Editor
Before diving into a disassembler, start with a hex editor to get a clear picture of the ROM's structure. A hex editor reveals essential details like the 16-byte header, PRG and CHR banks, and little-endian pointers (e.g., 5C 82 corresponds to the memory address 825C). This step helps distinguish code from other data types. For example, graphics data often appears as repeating byte patterns, while text strings may show up in the ASCII view - especially if you've loaded a table file (.tbl) that maps hex values to characters. Always make a backup of your ROM before making any changes.
Loading ROMs into a Disassembler
After examining the ROM, load it into a disassembler like Ghidra or IDA Pro. For NES ROMs, Ghidra users can enhance the process by installing the Ghidra-Nes-Rom-Decompiler-Plugin via File -> Install Extensions. This plugin supports specific mappers, including 0, 1, 2, 7, 10, and 19. While disassemblers generate assembly code, they often miss many functions on the first pass. Using specialized plugins and scripts can help uncover additional functions that aren't automatically identified.
If the disassembler misinterprets sections of the ROM - such as treating jump tables as incorrect instructions like BIT - use commands like C to clear the misinterpreted bytes and manually define the correct instructions. Once the ROM is properly loaded, analyze the instruction flow to start decoding the game’s logic.
Analyzing Control Flow and Instructions
To understand how the game operates, trace its control flow through memory. Key entry points, such as the "Reset" or "VBlank" vectors, show where the CPU begins execution. Instructions like JMP (jump), JSR (jump to subroutine), and loops provide insight into how the game processes data. Many games use mechanisms like a "JumpEngine", which relies on tables of 2-byte addresses. Static disassemblers may misinterpret these tables as data, so you may need to redefine them manually as code.
"You will, without fail, find only two and only two different things in your ROM - data and code. That's it."
- Aeon Genesis
To make the disassembly more readable, replace raw numeric constants with descriptive labels. For instance, instead of $0300, you could label a memory address as PlayerHealth to clarify its purpose. This approach turns raw hex values into understandable source code, making it easier to work with. Whether you're fixing bugs, translating text, or adding new features, these techniques can transform a basic disassembly into a maintainable and modifiable codebase.
sbb-itb-9a4764e
Console-Specific Disassembly Techniques
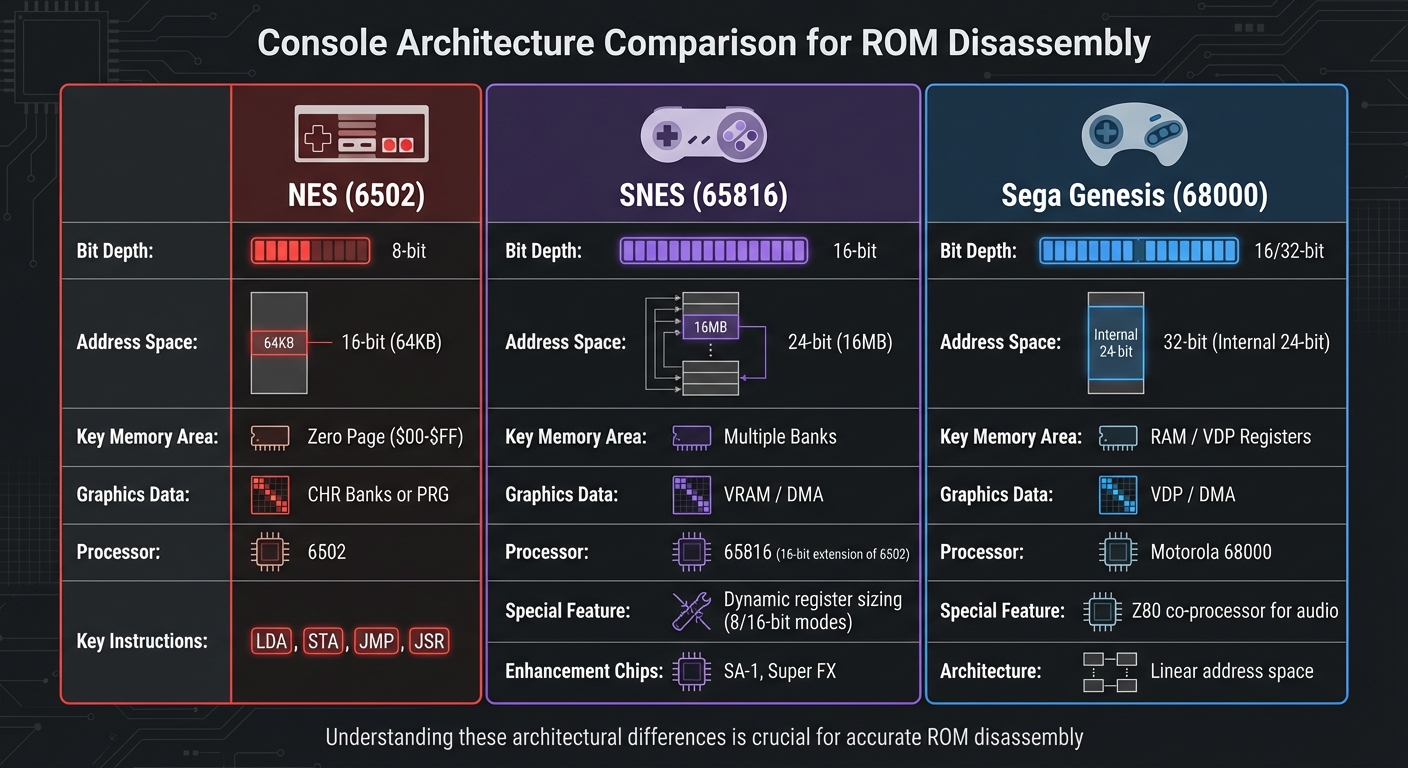
NES vs SNES vs Sega Genesis ROM Architecture Comparison
Building on the earlier discussion of general disassembly, these console-specific techniques help refine your approach for each retro system. Since each console is built around a unique processor architecture, understanding these differences is key to interpreting assembly code correctly and avoiding common missteps. For instance, the NES operates on an 8-bit 6502 processor, the SNES uses the 16-bit 65816, and the Sega Genesis relies on the Motorola 68000. Let’s dive into tailored methods for each console, building on the foundational techniques already covered.
Disassembling NES (6502) ROMs
The NES runs on an 8-bit 6502 processor with a 16-bit address space, totaling 64KB. Key memory ranges include internal RAM (0x0000–0x07FF), PPU registers (0x2000–0x3FFF), and PRG ROM (0x8000–0xFFFF). Instructions like LDA, STA, and JMP form the backbone of NES games. ROMs typically separate program and graphics data into distinct banks, while the Zero Page (0x0000–0x00FF) is reserved for fast-access variables.
The Zero Page is particularly important, as it often stores temporary variables and pointers crucial for tasks like bank switching or dynamic memory addressing. For example, Super Mario Bros. managed to fit its entire gameplay into a 40KB cartridge by making efficient use of these memory regions. Mapping out the game’s logical structure requires tracking control flow through instructions like JMP, JSR (Jump to Subroutine), and various branch commands. This approach works well when paired with hex-editing and debugging techniques discussed earlier.
Disassembling SNES (65816) ROMs
Disassembling SNES ROMs builds on NES techniques but requires additional attention to register states and bank switching. The SNES uses the 65816 processor, a 16-bit extension of the 6502, featuring a 24-bit address space (16MB total). One of the biggest challenges here is dynamic register sizing. The A, X, and Y registers can toggle between 8-bit and 16-bit modes, so the same opcode might behave differently depending on the processor's M/X flags. Disassemblers must account for these flags to correctly interpret instruction operands as either 8 or 16 bits.
SNES games often use multiple banks to store both code and graphics. Some titles also rely on enhancement chips like the SA-1 or Super FX, which introduce unique memory mapping requirements to address during disassembly. Setting breakpoints on Memory-Mapped I/O (MMIO) registers can reveal when and how the game performs bank switches or triggers DMA operations. This technique complements the hex-editing and debugging strategies previously outlined.
Disassembling Sega Genesis (68000) ROMs
The Sega Genesis introduces a new layer of complexity with its multi-processor setup and broader instruction set. Its Motorola 68000 processor features a linear address space, simplifying some aspects of disassembly, but the system’s instruction set is significantly larger than those of the NES or SNES. Additionally, Genesis games interact with a Z80 co-processor, primarily used for audio tasks, which requires analyzing how the 68000 and Z80 coordinate during gameplay.
"The art of TAS has surpassed merely playing a game. TASing is the game itself... This necessitates understanding the architecture and peculiarities of the target, and of the tools used to work said target." - feos, TASVideos
Using trace loggers to capture executed code can clarify how the 68000 and Z80 work together, making it easier to understand their coordination during gameplay. This method works hand-in-hand with the hex-editing and debugging techniques previously discussed.
| Feature | NES (6502) | SNES (65816) | Sega Genesis (68000) |
|---|---|---|---|
| Bit Depth | 8-bit | 16-bit | 16/32-bit |
| Address Space | 16-bit (64KB) | 24-bit (16MB) | 32-bit (Internal 24-bit) |
| Key Memory Area | Zero Page ($00-$FF) | Multiple Banks | RAM / VDP Registers |
| Graphics Data | CHR Banks or PRG | VRAM / DMA | VDP / DMA |
Advanced Analysis and Labeling Techniques
After disassembling code, the next step is to dig deeper with advanced analysis and labeling. While basic disassembly provides raw outputs like function calls (call $4563) or memory accesses (ld a, [$C14B]), these alone don’t explain why the code behaves a certain way. That’s where labeling and dynamic analysis step in. As Vextrove from the LADX-Disassembly project explains:
"Disassembling the code is easy, and computers are very good at it. What is difficult is to label and comment the original code, clarifying the purpose behind calls and memory operations".
By assigning clear labels and leveraging dynamic tools, you can gain a much deeper understanding of the code’s purpose and functionality.
Labeling Variables and Routines
One of the first steps is assigning meaningful names to variables and routines. Instead of working with cryptic raw addresses like $C14B, you can replace them with descriptive labels such as wPegasusBootsChargeMeter. This approach makes the code easier to follow. For example, in May 2020, contributors to the Link's Awakening DX disassembly project identified a RAM address and renamed a generic function (func_020_52C3) to ChargePegasusBoots. This small change made the routine’s purpose instantly clear.
To figure out what a variable does, you can use the "return" testing method. This involves altering a function’s first instruction to ret (return) in your debugger, then observing what breaks in the game. For instance, if disabling a function prevents the player from charging their boots, you’ve likely found the charging routine. Similarly, tracking which RAM addresses change during specific actions - like jumping or taking damage - can provide more clues. Labels also help separate code from data; for example, a series of repeated nop instructions or nonsensical add sequences might indicate that a data array has been misinterpreted as executable code.
Dynamic Debugging with Emulators
Dynamic analysis takes things a step further by showing how the code behaves in real time. Tools like Mesen and BGB emulators are invaluable here, offering features like conditional breakpoints and watch expressions. These tools let you monitor variables or memory addresses as the game runs. For example, you can use watch expressions with C-style syntax to view data structures, such as [$30, 16] to observe 16 bytes starting at address $30.
Another powerful feature is Code/Data Logging (CDL). This tracks which bytes in the ROM are executed as code and which are treated as data during gameplay. The result is a mask file (e.g., .cdl) that helps your disassembler distinguish between code and data, reducing the chance of misinterpretation. Additionally, by inspecting the call stack or manipulating RAM values during runtime, you can quickly confirm the role of specific variables or functions.
Once you’ve gathered these insights, you can start building a comprehensive symbol table to organize and refine your understanding of the ROM.
Building Symbol Tables
A symbol table serves as a map, linking every important address to a descriptive label. These definitions are usually saved in external files (e.g., .xml, .tbl) for easy reuse. Modern debuggers allow you to label different memory regions, such as PRG ROM (code), Work RAM (variables), and Save RAM. For structures like arrays or pointers, you can define a "Length" attribute, enabling the debugger to display offsets (e.g., MyArrayLabel+2) rather than raw numbers.
For more modern systems like the N64, tools like n64sym can speed up the process. By comparing your ROM against known library symbols from the Ultra64 SDK, these tools can automatically label standard functions, saving you hours of manual effort. The ultimate goal is to replace every ambiguous "magic number" with clear, contextual labels. This transforms a messy wall of hex into readable, logical code that you can easily modify, reassemble, and understand at a glance.
Conclusion
Disassembling ROMs becomes much more approachable once you understand the basics. A solid foundation in hexadecimal and the proper tools - like hex editors, disassemblers, and debugging emulators - is absolutely essential for success.
The secret to mastering ROM hacking lies in starting small and building your expertise step by step. As InVerse, the author of The Definitive Guide to ROM Hacking, puts it:
"The one quality that all good ROM hackers possess is enjoyment of figuring out how something works and learning new things".
This curiosity-driven mindset is crucial when diving into the complexities of ROMs, whether you're tweaking graphics or modifying gameplay logic. Beginners might find it easier to start with NES or Game Boy ROMs, as these often feature uncompressed graphics and have well-established debugging tools like FCEUX. Puzzle and action games are typically less daunting than RPGs, which often include compressed scripts and intricate pointer systems.
To test your changes, savestate hacking can be a game-changer. It allows you to quickly verify modifications without the need to rebuild the entire ROM. Experimenting with hex values - essentially trial and error - can reveal whether a specific data block controls graphics, levels, or even physics. Debugging emulators with breakpoints can also help you trace the code’s flow and pinpoint how specific elements function.
As you progress, you’ll find that disassembly is an iterative process. Early attempts might misinterpret data as code or miss key patterns, but with time, your understanding of a ROM’s structure will improve. This growth is reflected in better symbol tables and more accurate analyses. Mastering one console's assembly language, like the 6502 for the NES, can pave the way for tackling others more easily.
One last tip: always maintain rigorous backups in multiple locations. A single corrupted file could wipe out hours of hard work. With patience, curiosity, and the right tools, you can transform mysterious hex dumps into modifiable code, unlocking the secrets behind your favorite retro games.
FAQs
What makes it difficult to separate code from data when disassembling ROMs?
One of the toughest parts of ROM disassembly is figuring out what’s executable code and what’s raw data. Both are stored together without clear boundaries, making it easy to confuse things like data tables, graphics, or text with actual instructions. This can lead to messy, incorrect outputs. Plus, disassemblers often struggle to tell if a byte is meant to be executed or simply read during runtime, which can cause large chunks of the ROM to be classified incorrectly.
To tackle this, many hobbyists turn to tools like runtime loggers. These tools track which bytes are executed or read while the game is running, offering valuable insights. Pairing these tools with manual techniques - like spotting patterns, cross-referencing pointers, or testing in an emulator - can help create a much clearer picture of what’s what in the ROM. If you’re curious about diving into these methods, BJ's Game Vault has a collection of classic ROMs and custom cartridges that are perfect for hands-on learning.
How can debugging emulators improve the ROM disassembly process?
Debugging emulators are incredibly useful for ROM disassembly, giving you the ability to examine a game's code in real-time, just as if it were running on the original hardware. With tools like breakpoints, step-by-step execution, and memory viewers, you can pause the program, check CPU registers, and determine whether certain instructions are executable code or simply data. These features take much of the guesswork out of the process, making it easier to refine your disassembly.
Advanced options like trace loggers, performance profilers, and code/data loggers offer deeper insights into how the game operates. Want to understand control flow, timing, or memory usage? These tools have you covered. For instance, memory viewers can reveal RAM or graphics data, helping you connect visual elements like sprites to their corresponding code. If you’re eager to sharpen your debugging skills, BJ’s Game Vault has custom cartridges and rare ROM hacks that make for excellent practice material.
Why is it important to understand a console's processor architecture when disassembling ROMs?
Understanding the processor architecture of a console is key to grasping how it handles instructions, manages memory, and communicates with hardware. Every console is built with its own distinct features, such as its instruction set, memory layout, and hardware-specific behaviors. These elements directly affect how ROM data is organized and executed.
Familiarity with the architecture allows you to properly decode and interpret disassembled code, helping you uncover useful insights while minimizing errors during analysis. This becomes even more critical with retro consoles, where unique hardware quirks often have a big impact on how games operate.