


How to Add Custom Mechanics to Retro Games
Want to tweak a retro game to make it your own? ROM hacking lets you modify classic games by editing their code, graphics, or mechanics. Whether you're creating new features, fixing bugs, or transforming gameplay, this guide walks you through the process step by step.
Here’s the quick breakdown:
- Tools You'll Need: Emulators like FCEUX, hex editors, and patching software such as Floating IPS or xDelta UI.
- Where to Start: Begin with a legally obtained ROM, verify its integrity, and back it up before making changes. (Follow a ROM hack beginner's checklist to ensure your setup is correct.)
- Adding Custom Mechanics: Use hex editing vs. script editing to locate unused space in the ROM and write custom code (e.g., assembly programming for NES or SNES). Debugging tools in emulators help you test your changes.
- Updating Graphics: Tools like Tile Layer Pro or unLZ-GBA allow sprite editing. Ensure animations follow game-specific formats.
- Testing: Always test on emulators and real hardware (e.g., Everdrive) to catch potential issues.
- Sharing Your Work: Distribute patch files (not full ROMs) via platforms like Romhacking.net. Physical cartridges can be created using services like BJ's Game Vault.
Whether you're working on NES, SNES, Sega Genesis, or GBA games, this guide equips you with the basics to get started and take your retro gaming projects to the next level.
Making Fire Emblem Romhacks: Custom Classes
sbb-itb-9a4764e
Setting Up Your Tools and Workspace
Creating a clean and organized workspace with the right tools is crucial to avoid crashes, data loss, and compatibility headaches.
Tools You'll Need for ROM Hacking
The tools you need depend on what you want to modify. For patching and distribution, consider these options:
- Rom Patcher JS: A simple online tool.
- Floating IPS (flips): Ideal for .ips and .bps files.
- xDelta UI: Commonly used for .xdelta files, especially with DS games.
- MultiPatch (for macOS): Handles multiple formats but requires you to manually add the correct file extension, like .gen or .nes, to keep your ROM functional.
For debugging, pick an emulator with development features. FCEUX is a solid choice, offering tools like a debugger, trace logger, RAM filter, and PPU viewer. If you're diving into raw data, hex editors are essential. For those focusing on dialogue, a guide to ROM text editing can help you navigate table files and pointers. For sprite and tile editing, tools like Tile Layer Pro, NES CHR Editor, and Piskel are great options. For advanced mechanics or custom code, you'll need assemblers, debuggers, and decompilation tools - especially for games with decompiled source code. Console-specific utilities, like UberASM for Super Mario World, let you add entirely new mechanics.
Preparing Your ROM and Development Environment
Start with a legally obtained, unmodified ROM. Use an online hash verifier to check its CRC32, MD5, or SHA-1 values. This ensures your ROM matches the version required by your tools and patches. Keep in mind that regional differences matter - a Japanese ROM will differ in structure and hash from its US or European counterparts.
Always back up your original ROM. Use "Save As" to create a copy before making any changes. If you're using Windows tools like xDelta UI, ensure your system has the correct .NET Framework versions (2.0, 3.0, or 3.5) to avoid errors when launching the software.
Organizing Your Workspace
Good organization can save you a lot of headaches. Create separate folders for:
- Original ROMs
- Modified versions
- Tools
- Documentation
When editing graphics, keep a log of which 8x8 pixel tiles correspond to specific sprites. NES games, for example, store sprite data in CHR banks, with larger sprites often made up of multiple tiles.
Test your changes immediately after saving. Web-based emulators or dedicated testing software are perfect for this. Testing small adjustments as you go makes it easier to spot and fix errors early. If you're new to ROM hacking, start with games like Super Mario World or Pokémon FireRed. These have extensive community resources and specialized tools to help you get started.
With your tools in place, a clean ROM ready, and your workspace set up, you're ready to dive into creating custom mechanics.
Step-by-Step Guide to Adding Custom Mechanics
To start adding custom mechanics to your ROM, you’ll need to locate free space in the ROM file. Use a hex editor to find areas filled with long sequences of FF or 00, which typically indicate unused sections of the ROM.
Adding New Gameplay Features
Before diving into new features, take time to understand the existing game logic. Use an emulator's debugging tools to set breakpoints on relevant memory addresses. Once you’ve identified where to hook into the existing code, write your assembly routines (e.g., 65816, Z80, or 6502) accordingly. If your changes involve video memory, ensure your routines include waits for V-Blank or H-Blank to avoid graphical glitches.
Make sure to complete your custom logic before using tools like Lunar Magic for level editing. Editing levels in a ROM with incomplete code can lead to corrupted mechanics. For Game Boy hacks, prioritize placing frequently executed code in Bank 0, as this bank is always accessible in memory.
Once your gameplay logic is integrated, update the visuals to align with your new mechanic.
Modifying Graphics and Animations
Graphics and animations are vital for making your new mechanics visually coherent. Start by exporting existing sprites to maintain proper dimensions and palette restrictions. Use tools like unLZ-GBA or Tile Molester to import your custom graphics. Don’t forget to export the palette to ensure accurate color mapping.
For games like Pokémon Emerald, animations require a specific format where sprites are stacked vertically. Your custom animations need to follow this format to function correctly in the game. When editing sprites, use the original background fill color to ensure proper transparency rendering.
After making these visual updates, thoroughly test your changes to confirm everything works as intended.
Testing and Debugging Your Changes
Testing is crucial at every stage. Use multiple emulators to catch potential issues early. Implement in-game testing modes to quickly verify your new mechanics without needing to play through the entire game.
Always test your final ROM on real hardware using devices like the Super Everdrive. Real consoles can reveal timing issues and crashes that emulators might overlook. Additionally, use tools like SNEStuff to verify ROM headers and ensure they’re correctly configured for your target hardware.
As one ROM hacker shared:
"For me, I played my first Zelda game when I was pretty young, and at the time, I thought the game did star Princess Zelda. I figured I'd get to play as a magical battle princess that saved her kingdom... there's nothing standing in the way of me creating the games I want to play".
Console-Specific Techniques and Tools
ROM Hacking Tools and Techniques Comparison by Console Platform
Once you've grasped the basics of custom mechanics, it's time to dive into the technical quirks of individual consoles. Retro systems each come with their own unique challenges. For example, the NES relies on 8-bit 6502 Assembly and operates within a tight 64KB memory limit. The Sega Genesis, on the other hand, demands strict word alignment - sending 16-bit commands to odd-numbered addresses can crash the system. The SNES brings additional hurdles with its 16-bit 65816 Assembly, requiring careful checksum management across varying cartridge sizes. Meanwhile, hacking the GBA involves working with its 32-bit ARM architecture and dealing with save types like SRAM, Flash, and EEPROM, which can lead to compatibility problems with reproduction cartridges.
Comparing Tools Across Platforms
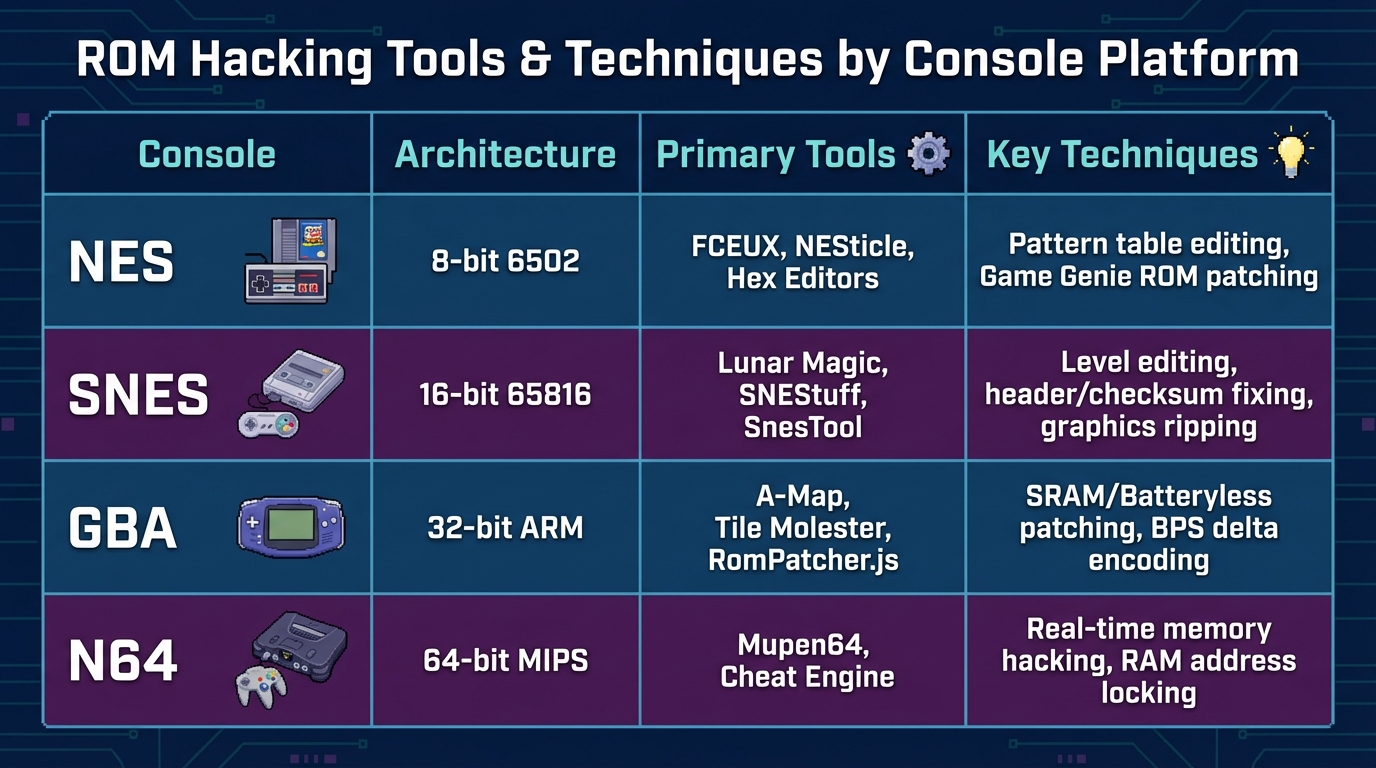
Tackling these platform-specific challenges means using the right tools and techniques for each console. Here's a quick breakdown:
| Console | Architecture | Primary Tools | Key Techniques |
|---|---|---|---|
| NES | 8-bit 6502 | FCEUX, NESticle, Hex Editors | Pattern table editing, Game Genie ROM patching |
| SNES | 16-bit 65816 | Lunar Magic, SNEStuff, SnesTool | Level editing, header/checksum fixing, graphics ripping |
| GBA | 32-bit ARM | A-Map, Tile Molester, RomPatcher.js | SRAM/Batteryless patching, BPS delta encoding |
| N64 | 64-bit MIPS | Mupen64, Cheat Engine | Real-time memory hacking, RAM address locking |
For SNES projects, make sure to check whether your ROM has a header using tools like SNEStuff before applying patches. Many hacks require either a headered or headerless file, and mismatched formats can lead to patching issues. Similarly, when working on GBA games, opt for the BPS (Binary Patching System) format instead of the older IPS format. BPS supports files larger than 16MB and includes automatic checksum verification, making it a more reliable option.
Examples of Console-Specific Customizations
Some of the best examples of custom mechanics come from developers who have pushed these consoles to their limits. For instance, BillyTime! Games created a custom XP system for Streets of Rage 2 on the Sega Genesis. They achieved this by hijacking code at offset 00545C with a JMP command, allowing them to scale player damage and defense based on the score stored in RAM. They also added save/load functionality to Shinobi III by redirecting level-transition code to trigger SRAM write and read routines.
On the GBA, Fire Emblem: Vision Quest completely reimagined Fire Emblem: The Sacred Stones with a new story, 62 playable characters, and 41 chapters. It even introduced advanced features like a skill system and Tellius-style support mechanics. Another standout is Metroid: Spooky Mission, which transformed Metroid: Zero Mission into a Halloween-themed adventure. This hack included custom graphics, new music, and a tractor beam mechanic.
If you're planning to create custom cartridges for these kinds of projects, BJ's Game Vault offers services for manufacturing custom game cartridges for systems like the NES, SNES, Sega Genesis, N64, and GBA. These tools and techniques provide a solid foundation for testing and sharing your ROM hacks with the community.
Finalizing and Sharing Your Custom ROM Hacks
Once you've thoroughly tested your custom mechanics, it's time to prepare your ROM hack for release.
Building and Finalizing Your ROM
Before sharing your work, create a BPS (Binary Patching System) patch file. This ensures compatibility with the correct base ROM version, thanks to built-in checksum verification.
Testing on original hardware is a must. Devices like Everdrive or EZ-Flash can reveal hardware-specific issues that emulators might overlook. Pay close attention to save functionality - especially for GBA games, which may need SRAM or 1M Flash patching to work properly on reproduction cartridges. If you're using older flashcarts like the standard EZ-Flash Omega, wait at least 5–10 seconds after saving in-game before turning off the device to avoid SD card corruption.
Creating Custom Cartridges for Your Hacks
For those who love the idea of physical cartridges, producing your own can be a fun next step. You can go the DIY route by purchasing cartridge shells (about $1.00 each) and flashable bootleg cartridges (around $5.00). Use tools like Joey Jr or GBxCart to flash your ROM, and design custom labels at 1380 x 687 pixels with tools like GIMP or Photoshop.
If DIY isn’t your thing, services like BJ's Game Vault can handle the process for you. They create custom cartridges for systems like NES, SNES, Sega Genesis, N64, and GBA. Their ROM hack cartridges are pre-tested on original hardware, ensuring compatibility and proper save functionality. Prices typically range from $29.99 to $59.99.
Sharing Your Work with the Community
When distributing your ROM hack, always share patch files instead of full ROMs. This allows others to enjoy your custom mechanics while avoiding legal issues. Tools like RomPatcher.js make it easy to create and apply patches, supporting all major formats and working across multiple platforms.
To reach your audience, upload your patch to platforms like Romhacking.net or forums such as PokéCommunity. Be careful not to include links to base ROM downloads, as this can lead to legal complications. If you'd like to offer physical copies without managing production yourself, BJ's Game Vault provides a marketplace where your tested ROM hack cartridges can connect with collectors who love unique gaming experiences.
Conclusion
Making custom mechanics for retro games has never been easier, thanks to modern tools and a community that’s been evolving for over two decades. The process starts with verifying your ROM, applying patches, and gradually moving to more advanced modifications with specialized tools. Whether you’re tweaking small details or adding entirely new features, staying organized and testing thoroughly are key.
What makes ROM hacking so exciting is the creative freedom it offers. Communities like SMW Central, with over 74,000 registered members, and projects like the 100+ custom hacks for Streets of Rage 2, show how much is possible when enthusiasts come together. By joining these groups, you’re stepping into a world of creators who are constantly reimagining what classic games can be.
Once your mechanics are polished, it’s time to share your work. You can distribute patch files online or go a step further by creating physical cartridges. Services like BJ's Game Vault specialize in producing custom cartridges for systems like the NES, SNES, Sega Genesis, N64, and GBA, with prices ranging from $29.99 to $59.99. These cartridges are tested on original hardware, ensuring your customizations provide an authentic retro experience.
Whether you’re swapping characters, designing new levels, or experimenting with game physics, ROM hacking lets you turn the games you love into something entirely your own. Start small, explore the possibilities, and share your creations - the retro gaming community is always ready to celebrate fresh ideas for classic titles.
FAQs
How do I find free space in a ROM safely?
To find free space in a ROM safely, start by opening the file in a hex editor like HxD. Look for sections filled with bytes such as 0xFF, as these often represent unused space. Before assuming these areas are free, double-check the surrounding data to ensure they don’t contain important code or graphics. If you can’t locate any free space, you might need to expand the ROM and adjust its header byte to reflect the changes.
Which emulator is best for debugging my changes?
The go-to emulator for debugging SNES modifications is bsnes-plus. It delivers precise hardware emulation alongside a solid suite of debugging tools. If you're working on NES games, Mesen stands out with its thorough debugger features.
Pick your emulator based on the platform you're targeting: bsnes-plus for SNES and Mesen for NES.
Why does my hack work in emulators but crash on real hardware?
Emulators can’t fully mimic the original console hardware, which means your hack might function well in an emulator but fail on actual devices. Problems like memory handling, timing discrepancies, or hardware-specific quirks could lead to crashes when running on real hardware. To minimize these risks, design your modifications with hardware limitations in mind and, whenever you can, test your hack on the original physical devices.